trompe l’oeil fruit pastry
The first thing that makes this dessert unforgettable is the moment you realize it is not actually a piece of fruit at all. It looks polished, glossy, and almost too beautiful to touch, then you cut in and discover layers of mousse, fruit filling, and delicate pastry tucked inside. Trust me, you’re going to love this. It feels elegant, playful, and just dramatic enough to make everyone at the table stop and stare for a second before diving in.
A dessert that feels like edible magic
Some desserts are delicious, and some desserts create a whole moment. This one does both. A trompe l’oeil fruit pastry gives you that wonderful little surprise of illusion, where the outside looks like a perfectly ripe piece of fruit, but inside there is a soft, creamy, carefully layered treat waiting for you. It is sweet, silky, bright, and completely memorable, which is exactly why this one’s a total game-changer for special occasions.
The artistry behind this pastry illusion
This style of dessert comes from the long tradition of French pastry artistry, where technique and beauty go hand in hand. The phrase trompe l’oeil means to trick the eye, and in pastry kitchens it has become a way to transform familiar shapes into something luxurious and unexpected. Over time, chefs began crafting desserts that looked like lemons, apples, peaches, and pears, each one hiding mousse, inserts, and sponge or biscuit layers inside. Let me tell you, it is worth every bite, especially when something this artistic also tastes incredible.
Why this showstopping dessert is worth making
Before we get into the process, it helps to know exactly why this pastry earns its place on the table.
Versatile: It works beautifully for birthdays, dinner parties, holidays, or any day when you want dessert to feel extra special. It can also be adapted to different fruit flavors without losing its wow factor.
Budget-Friendly: While it looks expensive, many of the ingredients are surprisingly simple. You are mostly paying with time and care, not impossible-to-find ingredients.
Quick and Easy: The look is advanced, but the steps themselves are very manageable when broken down. Each component is straightforward, and the final result feels far more complex than the work involved.
Customizable: You can change the fruit puree, color, and mold shape to create different versions. That means one base idea can turn into several elegant desserts.
Crowd-Pleasing: People love the surprise factor, and the flavor is just as exciting as the presentation. It is the kind of dessert guests talk about long after the plates are cleared.
Make-Ahead Friendly: This is a dream dessert for planning ahead because the pastries need chilling and freezing time anyway. That makes entertaining much less stressful.
Great for Leftovers: Leftovers keep well in the refrigerator for a short time, and they still look gorgeous when served later. The texture stays creamy and satisfying.
Little pastry secrets that make a huge difference
Now that the magic of the dessert is already pulling us in, let’s talk about the tips that help it come out polished and beautiful.
- Freeze the mousse-filled molds completely before glazing, because the glossy finish needs a very cold surface to set smoothly
- Strain your fruit puree and glaze if needed, because tiny bits can affect the silky final look
- Keep the glaze at the right pouring temperature, around 90 to 95°F, so it coats evenly without becoming too thick or too thin
- Work calmly and assemble each layer with intention, because neat layering creates the clean slice that makes this dessert so impressive
The tools that help you create the illusion
This dessert feels refined, and the right tools make that refinement much easier to achieve.
Silicone Fruit Molds: These create the realistic fruit shape and help the pastries release cleanly after freezing.
Saucepan: You will need this for warming puree, blooming gelatin mixtures, and preparing glaze components.
Mixing Bowls: Separate bowls keep each component organized, especially when working with mousse, inserts, and glaze.
Fine Mesh Strainer: This helps smooth fruit puree and glaze for that polished finish.
Hand Mixer or Stand Mixer: Whipped cream blends into the mousse more evenly with a mixer and gives the dessert its airy texture.
Offset Spatula: Useful for smoothing bases and handling delicate pastry pieces.
Baking Sheet: Essential for chilling or freezing components on a level surface.
Round Cutter: Helps cut small cake or biscuit bases neatly so they fit the molded pastries.

The ingredients that build every gorgeous layer
And now let’s dive into the ingredients, because this dessert is really a story told in layers, each one bringing something soft, bright, creamy, or crisp.
- White Chocolate: 8 ounces, finely chopped, this gives the mousse richness and a smooth, elegant structure
- Heavy Cream: 2 cups, divided, part is warmed and part is whipped to create a light, silky mousse
- Fruit Puree: 1 cup, such as mango, raspberry, or peach, this brings the bright fruit flavor that defines the center
- Granulated Sugar: 1/3 cup, adds sweetness and balances tartness in the fruit layer
- Unflavored Gelatin: 2 1/4 teaspoons, helps set both the insert and the mousse for clean, beautiful layers
- Cold Water: 3 tablespoons, used to bloom the gelatin so it melts smoothly into the mixture
- Vanilla Extract: 1 teaspoon, softens and rounds out the flavor in the mousse
- Lemon Juice: 1 tablespoon, brightens the fruit notes and keeps the flavor lively
- Prepared Sponge Cake or Joconde: 1 thin sheet, cut into small rounds, this forms the delicate base
- Sweetened Condensed Milk: 1/2 cup, adds body and shine to the mirror glaze
- Glucose Syrup: 1/2 cup, helps create a smooth, glossy glaze finish
- Water for Glaze: 1/4 cup, combines with the other glaze ingredients for a pourable texture
- Additional Granulated Sugar: 3/4 cup, sweetens and stabilizes the glaze
- White Gel Food Coloring: a few drops, helps create an opaque glaze base
- Fruit-Toned Gel Food Coloring: as needed, gives the glaze its realistic fruit look
- Neutral Glaze or Cocoa Butter Spray: optional, a light finishing touch for extra shine and realism
Helpful swaps when you want a different spin
Once you see how the layers work together, it becomes easier to personalize the dessert without losing the beauty of the concept.
White Chocolate: Use good quality white baking chocolate instead of couverture if needed.
Fruit Puree: Passion fruit, strawberry, apricot, or blackberry puree all work beautifully depending on the fruit look you want.
Lemon Juice: Lime juice can add a slightly sharper brightness that pairs well with tropical fruits.
Prepared Sponge Cake or Joconde: A thin vanilla sponge works perfectly if you do not have joconde.
Glucose Syrup: Light corn syrup can be used in the glaze for a similar glossy texture.
The ingredients that do the heavy lifting
A couple of ingredients really define the success of this dessert, and once you understand them, the whole process makes more sense.
Fruit Puree: This is where the pastry gets its personality. It brings freshness, tang, color, and the fruit-forward flavor that makes the illusion feel complete.
White Chocolate: This creates a smooth, creamy mousse with structure, and it also gives the flavor a mellow sweetness that keeps the fruit from tasting too sharp.
The fun part, building the pastry step by step
At this point, all the pieces are on the table, and now it is time to turn them into something that looks almost too pretty to eat.
- Preheat Your Equipment: Preheat the oven to 350°F if you are baking your sponge from scratch, and line a small baking tray if needed.
- Combine Ingredients: Bloom the gelatin in cold water. Warm the fruit puree with sugar and lemon juice, then stir in part of the bloomed gelatin until dissolved to create the fruit insert. In a separate bowl, pour warm cream over the white chocolate, add vanilla, and stir until smooth.
- Prepare Your Cooking Vessel: Pour the fruit insert into small silicone insert molds or a shallow pan and chill or freeze until firm. Prepare the fruit-shaped silicone molds on a flat tray so they are ready for filling.
- Assemble the Dish: Whip the remaining cream to soft peaks and fold it gently into the white chocolate mixture along with the remaining dissolved gelatin. Pipe or spoon mousse into the fruit molds, press a frozen fruit insert into the center, then cover with more mousse. Finish each pastry with a thin round of sponge cake as the base.
- Cook to Perfection: Freeze the assembled pastries until completely solid, usually at least 4 to 6 hours or overnight. Meanwhile, prepare the mirror glaze by combining water, sugar, glucose syrup, and condensed milk, then stirring in bloomed gelatin and white coloring before adding the fruit-toned coloring.
- Finishing Touches: When the glaze cools to the proper pouring consistency, unmold the frozen pastries and place them on a rack. Pour the glaze evenly over each one, letting the excess drip away. Add subtle details like a small leaf decoration or gentle color shading if desired.
- Serve and Enjoy: Let the pastries thaw in the refrigerator until the mousse turns soft and creamy again, then serve chilled so the glossy finish and clean layers look their absolute best.
The beauty of the texture and flavor in every bite
This dessert is such a pleasure to eat because every layer brings something different. The glaze is smooth and shiny, the mousse is airy and creamy, the fruit insert adds a bright burst of flavor, and the sponge base gives just enough structure to keep everything balanced. You get sweetness first, then fruity freshness, then that soft melt-in-your-mouth finish that makes another bite impossible to resist.
Smart tips that make the process easier
As elegant as this pastry looks, a few practical tricks make it feel much more approachable.
- Freeze the desserts fully before glazing for the smoothest finish
- Use a small ladle or measuring cup to pour glaze evenly over the top
- Trim glaze drips with a warm knife for a cleaner plated look
- Chill the finished pastries long enough to thaw gently without losing shape
Common mistakes that can affect the final result
A dessert this polished deserves a little extra care, and these are the things most likely to get in the way.
- Glazing pastries that are not fully frozen, which can lead to a thin or uneven coating
- Using glaze that is too hot, which can melt the mousse surface
- Overwhipping the cream, which can make the mousse less smooth
- Making the insert too large, which can crowd the mousse and affect the clean slice
A quick look at the nutrition side
Servings: 8
Calories per serving: 320
Note: These are approximate values.
The timing that helps you plan ahead
Prep Time: 1 hour 10 minutes
Cook Time: 10 minutes
Total Time: 1 hour 20 minutes, plus chilling and freezing time
Make-ahead and storage tips that save stress
This is one of those rare desserts that actually benefits from being made in stages. You can prepare the inserts and mousse-filled molds a day or two ahead, then keep them frozen until glazing day. After glazing, store the finished pastries in the refrigerator for up to 2 days. For longer storage, keep them frozen in an airtight container and thaw in the refrigerator before serving. Avoid microwaving, because gentle thawing keeps the glaze smooth and the mousse creamy.
The best ways to serve this elegant dessert
Because the pastry already brings so much visual drama, serving can stay simple and graceful. Place each one on a plain dessert plate and let the glossy fruit shape shine. A few fresh berries, a spoonful of fruit sauce, or a tiny mint leaf can add a little contrast without distracting from the main event. It pairs beautifully with tea, coffee, or a light sparkling lemonade.
Clever ways to transform leftovers
If you happen to have leftovers, they can still feel exciting the next day. Slice one in half and plate it with whipped cream for a plated dessert look, or tuck small pieces into a dessert glass with extra fruit puree for a layered parfait-style treat. Even in a second form, the flavor and texture still feel luxurious.
A few extra notes before you start
This recipe rewards patience more than speed, so give yourself room to enjoy the process. Read through the steps before beginning, organize your components, and keep your freezer space ready. When each element is calm and controlled, the final result feels so much more achievable.
How to make it look bakery-level stunning
For that true pastry-shop finish, choose a glaze color that matches the fruit inspiration and keep it glossy rather than overly dark. Add soft shading with a little edible color if you want a more realistic look, and place the pastry with the prettiest side facing forward. A tiny decorative leaf or stem detail can make the illusion even more convincing.
Beautiful flavor variations to try next
There are so many ways to make this dessert your own once you understand the basic method.
Peach Style: Use peach puree with a warm orange-pink glaze for a soft, summery look.
Raspberry Style: Choose raspberry puree and a deep rosy glaze for a brighter, tangier finish.
Mango Style: Mango puree creates a sunny, tropical version with a smooth, mellow sweetness.
Lemon Style: Use lemon curd-style insert with a pale yellow glaze for a fresh, bright effect.
Pear Style: Build a pear-inspired version with subtle green glaze and vanilla-forward mousse for a delicate, elegant bite.
FAQ’s
Q1: What does trompe l’oeil mean in pastry?
It refers to a dessert designed to trick the eye by looking like something else, often real fruit.
Q2: Do I need special molds for this recipe?
Yes, silicone fruit molds make the illusion much easier and more realistic.
Q3: Can I use store-bought fruit puree?
Yes, as long as it has good flavor and a smooth texture.
Q4: Why does the pastry need to be frozen before glazing?
The cold surface helps the glaze set quickly and evenly for that glossy finish.
Q5: Can I make this without mirror glaze?
Yes, but the polished fruit illusion will be less dramatic. A cocoa butter spray or velvet finish can be another option.
Q6: How long can I keep the finished pastries?
They are best within 2 days in the refrigerator, or longer in the freezer.
Q7: Can I make them smaller?
Yes, mini versions work beautifully and look especially elegant for parties.
Q8: What if my glaze is too thick?
Warm it gently and stir until it reaches a smooth pouring consistency.
Q9: Can I use a different base instead of sponge cake?
Yes, a thin biscuit or soft cookie base can work as long as it fits neatly.
Q10: Is this dessert very sweet?
It is balanced rather than overly sweet, especially when paired with a bright fruit insert.
Conclusion
This trompe l’oeil fruit pastry is one of those desserts that feels like a little piece of edible theater. It is glossy, delicate, playful, and packed with beautiful layers that taste every bit as special as they look. Once you make it, you will see why people fall in love with this style of pastry, because it turns dessert into an experience, and honestly, that is such a lovely thing to share.
Print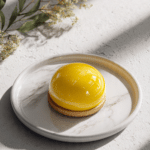
trompe l’oeil fruit pastry
- Prep Time: 1 hour 10 minutes
- Cook Time: 10 minutes
- Total Time: 1 hour 20 minutes, plus chilling and freezing time
- Yield: 8 servings
- Category: Dessert
- Method: Baking and Freezing
- Cuisine: French-Inspired
- Diet: Vegetarian
Description
An elegant fruit-shaped pastry with silky white chocolate mousse, a bright fruit puree center, a delicate sponge base, and a glossy mirror glaze that creates a beautiful trompe l’oeil effect.
Ingredients
- 8 ounces white chocolate, finely chopped
- 2 cups heavy cream, divided
- 1 cup fruit puree, such as mango, raspberry, or peach
- 1/3 cup granulated sugar
- 2 1/4 teaspoons unflavored gelatin
- 3 tablespoons cold water
- 1 teaspoon vanilla extract
- 1 tablespoon lemon juice
- 1 thin sheet prepared sponge cake or joconde
- 1/2 cup sweetened condensed milk
- 1/2 cup glucose syrup
- 1/4 cup water for glaze
- 3/4 cup additional granulated sugar
- A few drops white gel food coloring
- Fruit-toned gel food coloring, as needed
- Neutral glaze or cocoa butter spray, optional
Instructions
- Preheat the oven to 350°F if baking the sponge from scratch, and line a small baking tray if needed.
- Bloom the gelatin in the cold water.
- Warm the fruit puree with 1/3 cup granulated sugar and lemon juice, then stir in part of the bloomed gelatin until dissolved. Pour into small insert molds or a shallow pan and chill or freeze until firm.
- Warm part of the heavy cream, pour it over the white chocolate, add the vanilla extract, and stir until smooth.
- Dissolve the remaining gelatin, then fold it into the white chocolate mixture.
- Whip the remaining heavy cream to soft peaks and gently fold it into the white chocolate mixture to make the mousse.
- Place the fruit-shaped silicone molds on a flat tray. Pipe or spoon mousse into the molds, press a frozen fruit insert into the center, add more mousse, and finish with thin rounds of sponge cake or joconde as the base.
- Freeze the assembled pastries until completely solid, about 4 to 6 hours or overnight.
- Prepare the mirror glaze by combining 1/4 cup water, 3/4 cup additional granulated sugar, glucose syrup, and sweetened condensed milk. Stir in bloomed gelatin and white gel food coloring, then add fruit-toned gel food coloring as needed.
- Cool the glaze to a smooth pouring consistency. Unmold the frozen pastries, place them on a rack, and pour the glaze evenly over each one.
- Add neutral glaze or cocoa butter spray if desired, then transfer the pastries to the refrigerator to thaw until creamy and ready to serve.
Notes
- Freeze the pastries completely before glazing for the smoothest finish.
- Keep the glaze around 90 to 95°F so it coats evenly.
- Strain puree and glaze if needed for a more polished texture.
- Store finished pastries in the refrigerator for up to 2 days, or freeze for longer storage.
Nutrition
- Serving Size: 1 pastry
- Calories: 320
- Sugar: 24g
- Sodium: 70mg
- Fat: 21g
- Saturated Fat: 13g
- Unsaturated Fat: 7g
- Trans Fat: 0g
- Carbohydrates: 31g
- Fiber: 1g
- Protein: 4g
- Cholesterol: 55mg