No-Bake Peanut Butter Pie
There is something almost magical about a dessert that feels this rich and satisfying without ever asking you to turn on the oven. No-Bake Peanut Butter Pie is one of those treats that slides so easily into your day, whether you are making it for a holiday table, a birthday dinner, or just because you are craving something creamy, nutty, and downright irresistible. The filling is silky and lush, the crust brings that buttery crumbly contrast, and every bite feels like a little moment of comfort. Trust me, you’re going to love this.
Why This Creamy Pie Always Steals the Spotlight
Some desserts are nice to have around, and then there are desserts like this one, the kind people remember long after the plates are cleared. This pie has that old-school charm mixed with the kind of flavor that never goes out of style. The peanut butter brings warmth and richness, the cream cheese keeps the filling smooth and balanced, and the whipped topping gives it that cloud-like finish that melts so softly on the tongue.
What makes it even more lovable is how easy it is to pull together. You get a dessert that looks beautiful, tastes bakery-worthy, and still feels relaxed enough for a casual weekend. Let me tell you, it’s worth every bite.
A Sweet Slice of American Dessert Comfort
As we move from the first bite to the story behind it, this is where things get even more interesting. Peanut butter desserts have been a longtime favorite in American kitchens, especially because peanut butter itself became such a staple ingredient in the early twentieth century. Home cooks loved how affordable, flavorful, and versatile it was, and before long it started appearing in cookies, frostings, bars, and of course, creamy pies.
This chilled peanut butter pie fits right into that tradition of easy, crowd-friendly desserts that feel both nostalgic and dependable. It borrows a little of that diner-style dessert charm, with its fluffy filling and crumb crust, while still feeling right at home on a modern dessert table. It is the kind of pie that carries a little memory with it, and that is part of what makes it so special.
Reasons This Dessert Earns a Permanent Spot in Your Rotation
Now that the story is on the table, let’s talk about why this pie works so well in real life, not just in theory. This one’s a total game-changer, especially when you need something that feels impressive without being complicated.
Versatile: This pie fits just about any occasion, from family dinners to holiday spreads. You can dress it up with toppings or keep it simple and classic.
Budget-Friendly: Most of the ingredients are easy to find and fairly affordable, which makes this a smart dessert when you want maximum impact without overspending.
Quick and Easy: The filling comes together fast, and the refrigerator does most of the work. That means less stress and more time to enjoy the process.
Customizable: You can switch up the crust, add chocolate, or play with toppings depending on your mood. It is wonderfully flexible without losing its charm.
Crowd-Pleasing: Peanut butter lovers light up when they see this pie coming. The creamy texture and sweet-salty flavor balance win people over every time.
Make-Ahead Friendly: This is actually better after it chills, which makes it ideal for prepping in advance. You can make it the night before and let it settle beautifully.
Great for Leftovers: A chilled slice the next day is every bit as dreamy as the first. In some ways, the flavor gets even better once everything has had more time to meld.
Smart Little Secrets for a Better Pie Every Time
Before we get into the tools and ingredients, there are a few helpful tricks that can make the whole process feel smoother and the final pie even more delicious.
- Use softened cream cheese: This helps the filling blend smoothly, so you do not end up with lumps.
- Choose creamy peanut butter: Regular creamy peanut butter gives the best texture here. Natural peanut butter can separate and make the filling less stable.
- Chill the crust briefly before filling: Even a quick chill helps the crust hold together better when sliced.
- Fold gently: When adding whipped topping, use a light hand so the filling stays fluffy and airy.
- Give it enough chill time: A properly chilled pie slices more cleanly and has a much better texture.
The Kitchen Tools That Make It All Feel Easy
And now let’s dive into the practical side, because having the right tools nearby makes this dessert feel wonderfully low effort.
Mixing bowl: You will need a large bowl for combining the filling ingredients smoothly and evenly.
Hand mixer: This helps create that light, creamy texture without much effort.
Rubber spatula: Perfect for folding in the whipped topping and scraping every bit of filling into the crust.
Measuring cups and spoons: Accurate measuring keeps the texture balanced and the sweetness just right.
9-inch pie dish or ready-made crust tin: This is what gives the dessert its classic shape and makes serving simple.
Offset spatula or spoon: Helpful for smoothing the top so the finished pie looks neat and inviting.
Ingredients That Build All That Creamy, Nutty Goodness
With the tools ready, here are the ingredients that come together in the most delicious way. Each one has a job to do, and together they create that cool, silky filling with just the right amount of sweetness and body.
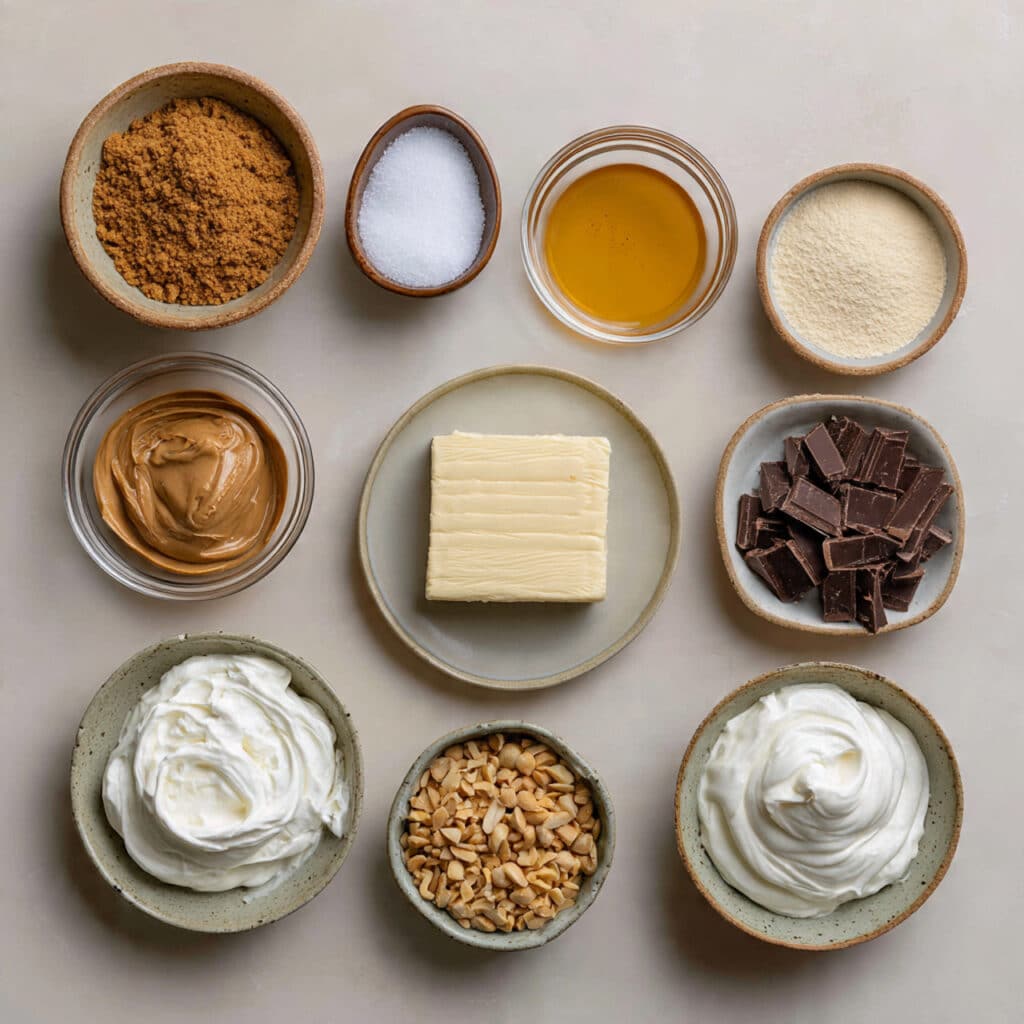
- Graham cracker crumbs: 1 1/2 cups, these create the buttery, sandy base that gives the pie structure and a gentle honey-like flavor.
- Granulated sugar: 1/4 cup, this sweetens the crust just enough and helps everything taste balanced.
- Unsalted butter, melted: 6 tablespoons, it binds the crust together and adds rich buttery flavor.
- Cream cheese, softened: 8 ounces, this gives the filling tang, stability, and a velvety texture.
- Creamy peanut butter: 1 cup, this is the star ingredient that brings deep nutty richness and smooth body.
- Powdered sugar: 1 cup, it sweetens the filling while keeping it soft and silky.
- Vanilla extract: 1 teaspoon, this rounds out the sweetness and adds warm bakery-style flavor.
- Frozen whipped topping, thawed: 8 ounces, this lightens the filling and makes it fluffy and mousse-like.
- Whipped cream, for topping: 1 cup, this adds a soft finish and makes every slice look extra special.
- Chopped roasted peanuts, for garnish: 2 tablespoons, these add a little crunch and extra peanut flavor.
- Chocolate shavings, optional: 2 tablespoons, these bring a pretty finish and a hint of chocolate that pairs beautifully with the filling.
Easy Swaps When You Want to Make It Your Own
One of the best things about a chilled pie like this is how easy it is to adapt. A few simple swaps can change the mood without changing the heart of the dessert.
Graham cracker crumbs: Crushed vanilla wafers or chocolate sandwich cookies.
Creamy peanut butter: Smooth almond butter or cookie butter, though the flavor will change.
Frozen whipped topping: Freshly whipped cream that has been whipped to stiff peaks.
Powdered sugar: A slightly reduced amount if you prefer a less sweet filling.
Chocolate shavings: Mini chocolate chips or a light drizzle of melted chocolate.
The Two Ingredients That Really Make the Magic Happen
As simple as the ingredient list is, there are two components doing the heavy lifting here, and they deserve a little spotlight.
Peanut Butter: This brings that unmistakable rich, toasty, nutty flavor that gives the pie its personality. It also helps create a thick, luscious filling that feels indulgent but still soft and airy.
Cream Cheese: This is what keeps the filling from tasting flat or overly sweet. Its slight tang balances the richness and gives the pie a creamy texture that feels smooth and polished.
Let’s Put This Pie Together
Now comes the fun part, and honestly, this process feels more like assembling a treat than tackling a complicated dessert. Here are the steps you’re going to follow.
- Preheat Your Equipment: No oven is needed for this pie, which is part of its charm. Instead, clear a little space in your refrigerator or freezer so the pie can chill properly once assembled.
- Combine Ingredients: In a medium bowl, stir together the graham cracker crumbs, granulated sugar, and melted butter until the texture looks like damp sand. In a separate large bowl, beat the softened cream cheese, creamy peanut butter, powdered sugar, and vanilla extract until smooth and creamy. Gently fold in the thawed whipped topping until the filling looks light and fluffy.
- Prepare Your Cooking Vessel: Press the crust mixture firmly into a 9-inch pie dish, covering the bottom and sides evenly. Chill the crust for 10 to 15 minutes so it firms up slightly before adding the filling.
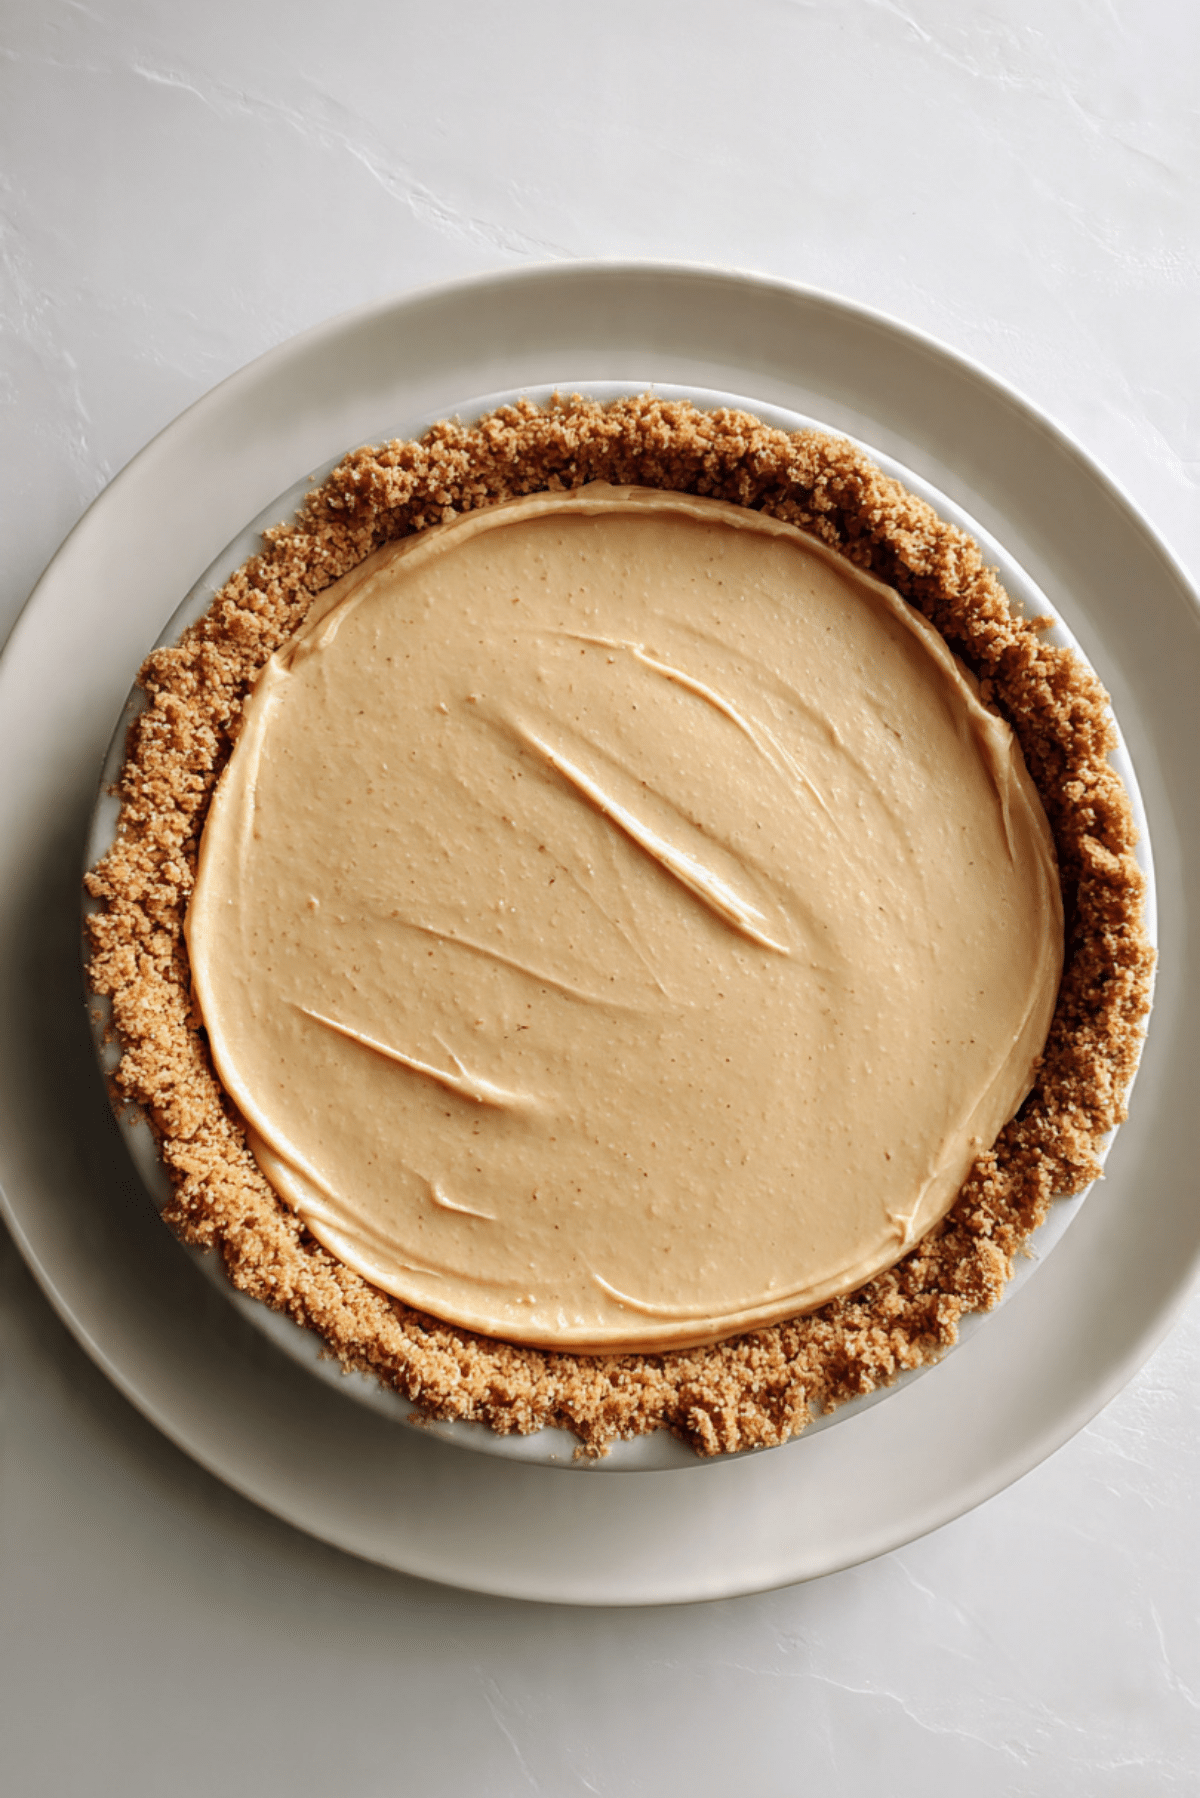
- Assemble the Dish: Spoon the peanut butter filling into the chilled crust and spread it into an even layer with a spatula. Smooth the top so the finished pie looks neat and inviting.
- Cook to Perfection: Since this is a no-bake dessert, perfection comes from chilling. Refrigerate the pie for at least 4 hours, or until the filling is firm enough to slice cleanly.
- Finishing Touches: Just before serving, top the pie with whipped cream, chopped roasted peanuts, and optional chocolate shavings for a little extra texture and flair.
- Serve and Enjoy: Slice the pie with a clean sharp knife, wiping between cuts for the prettiest slices. Serve it cold and enjoy every creamy, nutty, melt-in-your-mouth bite.
The Texture and Flavor Story in Every Bite
Once the pie is fully chilled, this is where everything comes together in the best way. The crust has a gentle crumbly snap that contrasts beautifully with the soft filling. Then the filling itself lands somewhere between mousse and cheesecake, creamy, light, and rich all at once.
Flavor-wise, it is a lovely layering of sweet and salty. The peanut butter brings warmth and depth, the cream cheese keeps things from becoming too heavy, and the whipped topping makes each bite feel soft and airy. Add the crunch of peanuts on top, and suddenly every forkful has a little contrast, a little creaminess, and a lot of comfort.
Helpful Tricks for the Smoothest, Creamiest Results
By now, you can probably already imagine that first chilled slice, and these extra tips help make sure it turns out just right.
- Chill the mixing bowl for a few minutes if your kitchen is warm, which helps the filling stay light and cool.
- Press the crust firmly with the bottom of a measuring cup for a tighter, cleaner base.
- For neater slices, refrigerate the pie overnight and cut with a knife dipped in warm water.
- Add toppings right before serving so they stay fresh and textured.
Common Slip-Ups and How to Avoid Them
Even an easy dessert like this has a few little traps, but nothing you cannot handle with a bit of awareness.
- Using natural peanut butter can make the filling oily or too loose, so stick with standard creamy peanut butter for the best texture.
- Skipping chill time leads to soft messy slices, so give the pie enough time to fully set.
- Overmixing after adding whipped topping can flatten the filling, so fold gently to keep it airy.
- A loosely packed crust can crumble when sliced, so take an extra moment to press it down well.
A Quick Look at the Nutrition
Before we move into timing and storage, here is a practical snapshot of what to expect per serving.
Servings: 8
Calories per serving: 490
Note: These are approximate values.
Time Breakdown Before You Dig In
This pie does not ask for much active work, which is one more reason it is such a favorite.
Prep Time: 20 minutes
Cook Time: 0 minutes
Total Time: 20 minutes, plus 4 hours chilling time
Make-Ahead and Storage Tips That Actually Help
And now let’s talk about keeping that beautiful texture intact, because this is a dessert that really shines when made ahead. You can prepare the entire pie one day in advance and let it chill overnight, which often makes the slices even cleaner and the flavor more settled.
Store leftovers covered in the refrigerator for up to 4 days. If you want to freeze it, wrap the pie tightly and freeze for up to 1 month. Let it thaw in the refrigerator for a few hours before serving. For best texture, add whipped cream and garnishes after thawing rather than before freezing.
The Best Ways to Serve This Creamy Favorite
When it is time to serve, this pie does not need much help, though a few thoughtful pairings can make it feel extra special. Serve each slice well chilled with a little extra whipped cream on top for a classic finish. A small sprinkle of chopped peanuts or chocolate shavings adds just enough crunch and contrast.
It also pairs beautifully with hot coffee, a cold glass of milk, or even fresh strawberries on the side if you want something bright to cut through the richness. For gatherings, serve smaller slices because this pie is satisfyingly rich.
Clever Ways to Turn Leftovers Into Something New
If you somehow end up with leftovers, there are some fun ways to give them a second life. A spoonful tucked into a dessert cup with crushed cookies becomes an easy parfait. You can also freeze small slices and enjoy them almost like an icebox dessert bar.
Another delicious idea is to crumble a leftover slice over vanilla yogurt or fold bits of it into a milkshake for a seriously indulgent treat. It is one of those desserts that keeps finding new ways to be useful.
Extra Little Touches That Make a Difference
Sometimes the smallest details are the ones that take a dessert from good to unforgettable. A pinch of flaky salt on top can highlight the peanut butter in the nicest way. A touch of vanilla in the whipped cream topping also makes the whole pie taste more rounded and homemade.
You can line the pie dish with parchment strips if you want easier lifting and cleaner serving. And always serve it cold, because that chilled texture is part of what makes the pie so refreshing and satisfying.
How to Make It Look Bakery-Worthy on the Table
This dessert already has plenty of charm, but a little visual care makes it feel even more impressive. Use a piping bag or even a zip-top bag with the corner snipped off to add swirls of whipped cream around the edge. Scatter chopped peanuts right over the whipped cream so they stay in place and look intentional.
For a simple elegant finish, add a few curls of chocolate or a light dusting of crushed graham crackers. Serve it on a clean cake stand or simple white plate, and suddenly this relaxed dessert feels celebration-ready.
Delicious Variations Worth Trying
Once you have made the classic version, it is hard not to start imagining all the other directions you can take it.
Chocolate Peanut Butter Version
Add 1/4 cup cocoa powder to the filling or use a chocolate cookie crust for a richer, more dessert-shop style flavor.
Mini Pie Cups
Divide the crust and filling into small jars or dessert cups for easy individual servings that look adorable on a party table.
Crunchy Peanut Twist
Use crunchy peanut butter in place of creamy if you want a little more texture throughout the filling.
Frozen Pie Style
Freeze the pie until firm and serve it semi-frozen for a cooler, firmer texture that feels perfect in warm weather.
Banana Peanut Butter Pairing
Layer thin banana slices over the crust before adding the filling for a sweet fruity note that works beautifully with the peanut butter.
FAQ’s
Q1: Can I use a store-bought graham cracker crust?
Yes, absolutely. It makes the process even faster and works very well for this pie.
Q2: How long does the pie need to chill?
At least 4 hours is ideal, but overnight gives the best texture and cleanest slices.
Q3: Can I make it ahead for a party?
Yes, this pie is excellent for making ahead. It actually benefits from extra chill time.
Q4: Can I use homemade whipped cream instead of whipped topping?
Yes, you can. Just whip it to stiff peaks so the filling stays light and holds its shape.
Q5: Is this pie very sweet?
It is sweet and rich, but the cream cheese helps balance the sweetness nicely.
Q6: Can I freeze individual slices?
Yes, wrap them well and freeze for easy grab-and-go treats later.
Q7: What kind of peanut butter works best?
Regular creamy peanut butter works best because it gives the filling a stable, smooth texture.
Q8: Can I make this without cream cheese?
Cream cheese is important for the texture and balance, so removing it would change the pie quite a bit.
Q9: How do I keep the crust from crumbling?
Make sure the butter is fully mixed in and press the crust firmly into the dish before chilling.
Q10: What toppings go best with this pie?
Whipped cream, chopped peanuts, and chocolate shavings are all wonderful choices that add both flavor and texture.
Conclusion
By the time this pie is chilled, topped, and ready to slice, it is hard not to feel a little proud of how effortlessly it all came together. No-Bake Peanut Butter Pie is creamy, cozy, and packed with the kind of flavor that makes people pause after the first bite and go back for another. It is simple enough for an everyday craving and special enough for celebrations, which is exactly the kind of dessert worth keeping close. Trust me, once you make it, this one is going to earn a regular spot in your kitchen.
Print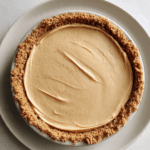
No-Bake Peanut Butter Pie
- Prep Time: 20 minutes
- Cook Time: 0 minutes
- Total Time: 20 minutes plus 4 hours chilling time
- Yield: 8 servings
- Category: Dessert
- Method: No-Bake
- Cuisine: American
- Diet: Vegetarian
Description
A rich and creamy no-bake peanut butter pie with a buttery graham cracker crust, a fluffy peanut butter filling, and a soft whipped topping finish. It is easy to make, perfect for preparing ahead, and always a crowd-pleasing dessert.
Ingredients
- 1 1/2 cups graham cracker crumbs
- 1/4 cup granulated sugar
- 6 tablespoons unsalted butter, melted
- 8 ounces cream cheese, softened
- 1 cup creamy peanut butter
- 1 cup powdered sugar
- 1 teaspoon vanilla extract
- 8 ounces frozen whipped topping, thawed
- 1 cup whipped cream, for topping
- 2 tablespoons chopped roasted peanuts, for garnish
- 2 tablespoons chocolate shavings, optional
Instructions
- Clear space in the refrigerator or freezer so the pie can chill properly once assembled.
- In a medium bowl, stir together the graham cracker crumbs, granulated sugar, and melted butter until the mixture resembles damp sand.
- Press the crust mixture firmly into a 9-inch pie dish, covering the bottom and sides evenly. Chill for 10 to 15 minutes.
- In a large bowl, beat the softened cream cheese, creamy peanut butter, powdered sugar, and vanilla extract until smooth and creamy.
- Gently fold in the thawed whipped topping until the filling is light and fluffy.
- Spoon the filling into the chilled crust and spread it into an even layer.
- Refrigerate the pie for at least 4 hours, or until firm enough to slice cleanly.
- Before serving, top with whipped cream, chopped roasted peanuts, and optional chocolate shavings.
- Slice and serve cold.
Notes
- Use regular creamy peanut butter for the best texture and stability.
- Softened cream cheese helps the filling blend smoothly without lumps.
- For cleaner slices, chill the pie overnight and wipe the knife between cuts.
- Add toppings right before serving for the freshest look and texture.
Nutrition
- Serving Size: 1 slice
- Calories: 490
- Sugar: 26g
- Sodium: 290mg
- Fat: 36g
- Saturated Fat: 14g
- Unsaturated Fat: 19g
- Trans Fat: 0g
- Carbohydrates: 35g
- Fiber: 2g
- Protein: 9g
- Cholesterol: 45mg