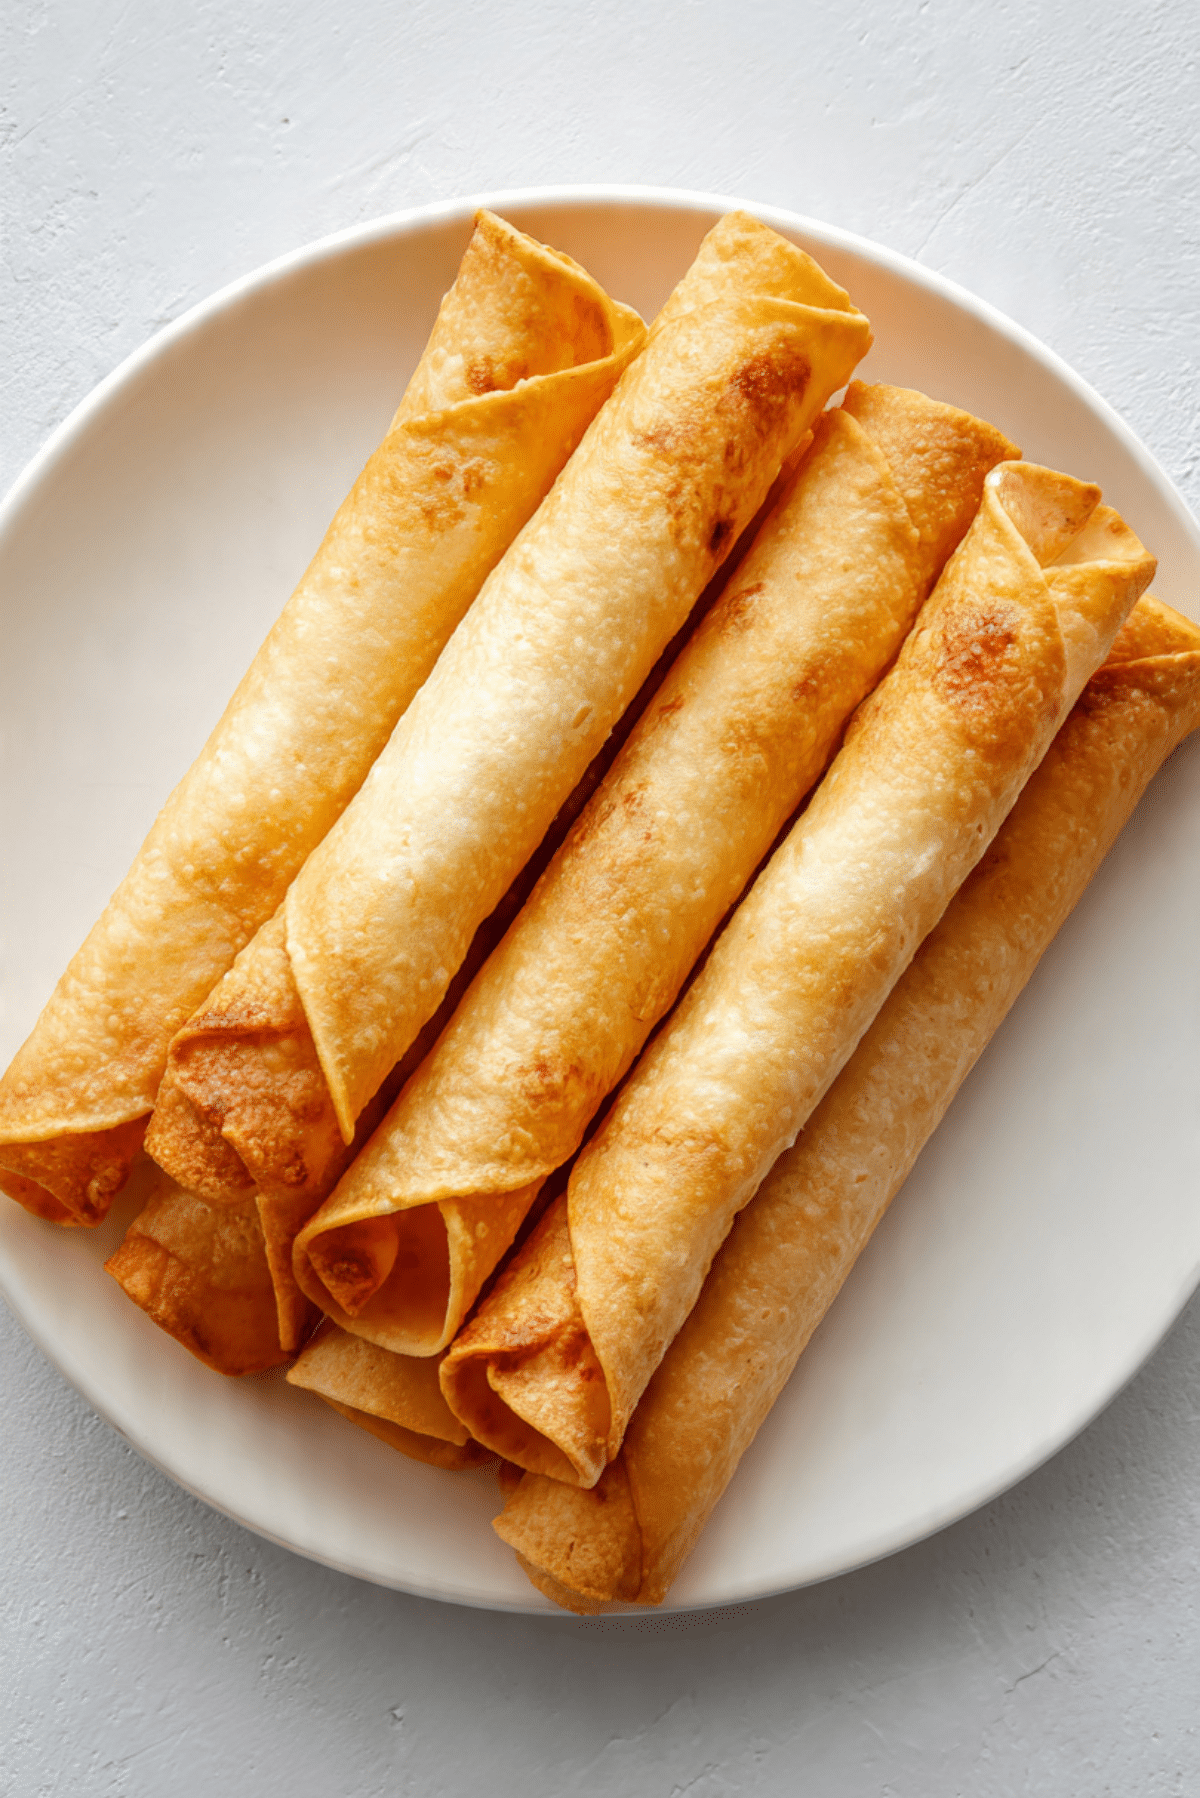
Chicken and cheese taquitos
There is something so comforting about a tray of crisp, golden taquitos fresh out of the oven. The outside turns beautifully crunchy, while the inside stays warm, creamy, and packed with savory chicken and melty cheese. Trust me, you’re going to love this, especially on a busy night when you want something that feels fun, satisfying, and a little bit irresistible.
Why These Crispy Taquitos Always Hit the Spot
Some meals just know how to bring everyone to the table fast, and this is one of them. You get that satisfying crackle from the toasted tortillas, then a rich, cheesy filling that feels cozy and flavorful in every bite. This one’s a total game-changer when you want comfort food that still feels easy enough to pull together without stress.
They work for family dinners, casual get-togethers, snack boards, or even a make-ahead lunch situation. And once you dip them into salsa, sour cream, or guacamole, let me tell you, it’s worth every bite.
The Story Behind This Crunchy Favorite
Now that the craving is fully in motion, it helps to know where this style of dish comes from. Taquitos are closely tied to Mexican and Mexican American cooking, where tortillas wrapped around a savory filling become something crisp, hearty, and deeply satisfying. Depending on the region, you might hear similar dishes called flautas, though the size and tortilla type can vary.
What makes them so lovable is their simplicity. They take everyday ingredients and turn them into something that feels festive and special. Over time, they became a popular favorite for weeknight meals, party platters, and freezer-friendly prep, which honestly makes perfect sense once you taste them.
Why This Recipe Deserves a Spot in Your Rotation
This dish has that perfect mix of comfort and practicality, which is exactly why it earns a regular place in the kitchen.
Versatile: You can serve these as a main dish, party snack, game-day bite, or easy lunch. They pair beautifully with dips, rice, beans, or a crisp salad.
Budget-Friendly: Most of the ingredients are simple and easy to find. Using cooked chicken and pantry spices keeps things affordable without sacrificing flavor.
Quick and Easy: Once the filling is mixed, everything comes together fast. Rolling the tortillas takes just a few minutes, and the oven does the rest of the work.
Customizable: You can adjust the cheese blend, spice level, or toppings to fit your taste. It is the kind of meal that bends easily to what you already have.
Crowd-Pleasing: Crispy outside, cheesy inside, and easy to dip, that combination wins almost every time. Kids and adults both tend to go back for seconds.
Make-Ahead Friendly: You can assemble them earlier in the day and bake when ready. They also freeze surprisingly well, which makes future you very happy.
Great for Leftovers: Reheated taquitos keep their charm, especially in the oven or air fryer. They make an excellent next-day lunch or snack.
Smart Little Secrets for Extra Crispy Results
Before you start rolling, a few small tricks can make a big difference. These insider tips help the filling stay creamy and the tortillas stay crisp instead of cracking or turning soggy.
- Warm the tortillas briefly before rolling so they become flexible and less likely to split.
- Do not overfill each one, because a modest amount keeps them tight and neat.
- Brush or lightly spray the outside with olive oil for better color and crunch.
- Place them seam-side down so they stay closed while baking.
- Leave a little space between each taquito on the pan so the heat can circulate evenly.
The Kitchen Tools That Make It Easy
The nice part about this recipe is that it does not ask for anything fancy. A few basic tools are all you need to get from filling bowl to crispy finish.
Mixing bowl: This is where the filling comes together, and a medium bowl gives you enough room to stir without making a mess.
Baking sheet: A sturdy baking sheet helps the taquitos crisp evenly and makes cleanup simple.
Parchment paper: This keeps sticking to a minimum and helps with easy lifting after baking.
Pastry brush or oil sprayer: A light coating of oil on the tortillas gives them that lovely golden finish.
Measuring cups and spoons: These keep the filling balanced, especially with spices and salsa.
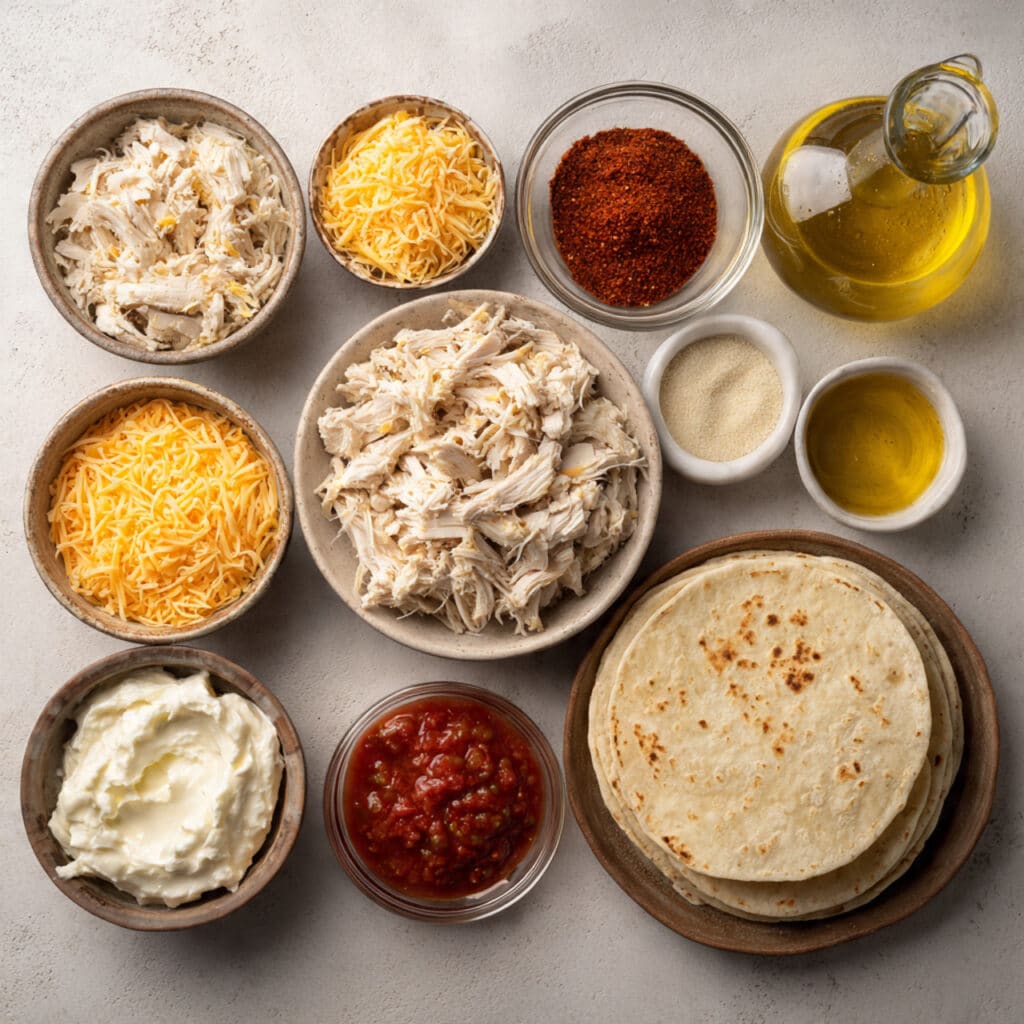
Ingredients That Build Big Flavor
And now we get to the good part, the ingredients that turn a handful of simple staples into something warm, cheesy, and seriously craveable. Each one plays its role, and together they create that perfect mix of creamy filling and crisp shell.
- Cooked shredded chicken: 2 cups, this gives the filling its hearty, savory base and makes the dish satisfying enough for dinner.
- Cheddar cheese: 1 cup, shredded, this adds bold cheesy flavor and melts beautifully into the filling.
- Monterey Jack cheese: 1 cup, shredded, this brings extra meltiness and a smooth, creamy finish.
- Cream cheese: 4 ounces, softened, this binds the filling and gives it a rich, creamy texture.
- Salsa: 1/4 cup, this adds moisture, brightness, and a gentle tomato-chile flavor.
- Chili powder: 1 teaspoon, this brings warmth and a mild smoky edge.
- Garlic powder: 1/2 teaspoon, this deepens the savory flavor in a simple, reliable way.
- Onion powder: 1/2 teaspoon, this adds a rounded, sweet savory note throughout the filling.
- Salt: 1/2 teaspoon, this wakes up the other flavors and keeps the filling from tasting flat.
- Black pepper: 1/4 teaspoon, this adds a mild peppery bite.
- Corn tortillas: 10 small tortillas, these create the crisp outer shell and keep the dish gluten free when using certified gluten free tortillas.
- Olive oil: 1 tablespoon, for brushing, this helps the tortillas brown and crisp in the oven.
Easy Swaps That Still Taste Amazing
One of the best things about this dish is how flexible it can be. So if your fridge looks a little different today, there is still plenty of room to make it work beautifully.
Cheddar cheese: Colby Jack or more Monterey Jack.
Monterey Jack cheese: Mozzarella or Oaxaca-style cheese.
Cream cheese: Plain Greek yogurt or ricotta for a lighter filling, though the texture will be a bit softer.
Salsa: Drained diced tomatoes with a spoonful of green chiles.
Corn tortillas: Gluten free tortilla alternatives that roll well.
Olive oil: Avocado oil.
The Ingredients That Really Make It Shine
As simple as the ingredient list is, a couple of items truly do the heavy lifting here. They are the reason each bite feels creamy, savory, and deeply satisfying.
Cream cheese: This is the secret to a filling that stays luscious instead of dry. It melts into the shredded chicken and creates a smooth, cohesive texture.
Corn tortillas: These bring that unmistakable toasted flavor and crisp edge. Once brushed with oil and baked, they turn beautifully golden and give the filling the perfect crunchy contrast.
Let’s Roll and Bake Something Delicious
Now that everything is ready, this is where the fun starts. The process is simple, and once you roll the first couple, the rest go quickly. Here are the steps you’re going to follow.
- Preheat Your Equipment: Preheat your oven to 425°F and line a baking sheet with parchment paper. This gives you a hot surface and an easy cleanup from the start.
- Combine Ingredients: In a medium mixing bowl, stir together the shredded chicken, cheddar cheese, Monterey Jack cheese, softened cream cheese, salsa, chili powder, garlic powder, onion powder, salt, and black pepper until evenly combined. The mixture should look creamy, well seasoned, and easy to scoop.
- Prepare Your Cooking Vessel: Warm the corn tortillas for about 20 to 30 seconds in the microwave under a damp paper towel, or heat them briefly in a dry skillet. This helps them bend without cracking. Set your lined baking sheet nearby for easy assembly.
- Assemble the Dish: Spoon about 3 tablespoons of filling onto the lower third of each tortilla. Roll each one up tightly and place it seam-side down on the prepared baking sheet. Repeat until all the filling is used, then brush the tops lightly with olive oil.
- Cook to Perfection: Bake for 18 to 22 minutes, or until the tortillas are golden and crisp around the edges. The filling should be hot and melty, and the tops should look lightly blistered and irresistible.
- Finishing Touches: Let them rest for 3 to 5 minutes after baking. This gives the filling a moment to settle and makes them easier to serve without tearing.
- Serve and Enjoy: Serve warm with your favorite dips like salsa, guacamole, or sour cream. A squeeze of lime on the side is especially nice if you want a little extra brightness.
The Texture and Flavor Payoff in Every Bite
Once they come out of the oven, the real magic shows up in the contrast. The tortillas become crisp and lightly crackly on the outside, while the inside stays creamy, cheesy, and packed with tender shredded chicken. That contrast is what makes each bite so satisfying.
Flavor-wise, the filling builds in a really lovely way. The cheeses bring richness, the salsa adds a gentle tang, and the spices layer in warmth without overpowering the dish. Nothing is too sharp or too heavy, which means every element gets a chance to shine together.
Helpful Tricks for Even Better Results
A few extra tips can make the whole experience feel smoother, especially if this is your first time making homemade taquitos. And honestly, even if it is not your first time, these little reminders still help.
- Warm the tortillas well: Flexible tortillas roll better and crack less, which makes assembly much easier.
- Keep the filling balanced: Too much filling can cause bursting, so stick to about 3 tablespoons each.
- Bake with space between them: Air circulation helps them crisp instead of steam.
- Let them rest briefly: A short rest after baking helps the filling stay in place when you bite in.
Common Mistakes and How to Dodge Them
Even easy recipes have a few little traps, but they are simple to avoid once you know what to watch for. Here is what can get in the way, and how to fix it.
- Using cold tortillas: This often leads to tearing. Warm them first so they roll smoothly.
- Overfilling the tortillas: This makes them hard to seal and more likely to burst during baking. Use a modest scoop.
- Skipping the oil: Without a little oil on the outside, they may dry out instead of crisping and browning nicely.
- Crowding the pan: Too many packed together means less crispness. Give each one a little breathing room.
Nutrition Snapshot at a Glance
If you like knowing the basics before serving, here is a simple overview. These numbers are approximate, but they give a useful idea of what to expect per serving.
Servings: 5
Calories per serving: 430
Note: These are approximate values.
Time Breakdown Before You Start
This recipe moves pretty quickly, which is one more reason it is so easy to love. Most of the time is hands-off baking, while the prep itself stays simple and manageable.
Prep Time: 20 minutes
Cook Time: 20 minutes
Total Time: 40 minutes
Make-Ahead and Storage Tips That Actually Help
If you like having dinner halfway done before the evening rush begins, this dish is perfect for that. You can mix the filling and roll the taquitos a few hours ahead, then keep them covered in the refrigerator until it is time to bake.
Leftovers store well in an airtight container in the fridge for up to 3 days. For longer storage, freeze them in a single layer until firm, then transfer to a freezer-safe bag or container for up to 2 months. Reheat in the oven at 400°F or in an air fryer until hot and crisp. The microwave works in a pinch, but the texture will be softer.
Serving Ideas That Make It Feel Like a Feast
Once these are on the table, it does not take much to turn them into a full and cheerful meal. Serve them with salsa, guacamole, or sour cream for dipping, then add cilantro lime rice, seasoned black beans, or a crunchy salad on the side.
They are also fantastic on a casual platter with sliced avocado, shredded lettuce, and fresh tomato. That way everyone can build their own plate and add the toppings they love most.
Tasty Ways to Reinvent the Leftovers
Leftovers rarely stay boring around here, and these are especially fun to repurpose. Chop a few up and tuck them into a rice bowl with salsa and avocado, or slice them into bite-sized pieces and pile them over a salad for extra crunch.
You can also serve reheated leftovers with scrambled eggs for a hearty breakfast plate. It sounds a little unexpected, but it works so well.
Extra Little Details That Make a Difference
By this point, you already know this recipe is easy, but a few final details can make it feel even more foolproof. Keep your filling well mixed so every taquito gets both chicken and cheese in each bite.
If your salsa is very watery, drain off a little excess liquid before mixing. That small step helps keep the filling creamy instead of loose, which makes rolling easier and crisping better.
How to Make Them Look as Good as They Taste
Presentation is half the fun, especially with a dish this golden and inviting. Arrange the taquitos in neat rows or a loose fan shape on a platter so the crispy edges are easy to see.
Add small bowls of salsa, guacamole, and sour cream around them for color and contrast. A sprinkle of chopped cilantro and a few lime wedges can make the whole plate look bright, fresh, and completely party ready.
Fun Variations Worth Trying
Once you make the basic version, it is easy to play around with it. Here are a few ideas that keep the spirit of the dish while changing the flavor just enough to keep things exciting.
Spicy Jalapeño Version: Add 2 tablespoons finely chopped pickled jalapeños to the filling for a punchier bite.
Creamier Green Chile Twist: Swap the salsa for 1/4 cup mild green chiles and a spoonful of plain Greek yogurt.
Extra Cheesy Batch: Add an extra 1/2 cup Monterey Jack for an even gooier center.
Air Fryer Method: Cook in batches at 400°F for 8 to 10 minutes, turning once, until crisp and hot.
Mini Party Taquitos: Use smaller tortillas and a little less filling for snack-size pieces that are perfect for platters.
FAQ’s
Q1: Can I use rotisserie chicken?
Absolutely. Rotisserie chicken works beautifully here and saves even more time, especially on busy nights.
Q2: Can I make these ahead of time?
Yes. You can roll them a few hours ahead and refrigerate until ready to bake.
Q3: How do I keep the tortillas from cracking?
Warm them first so they soften and become flexible. That one step makes a huge difference.
Q4: Can I freeze them before baking?
Yes. Freeze them in a single layer, then transfer to a freezer-safe container. Bake from frozen and add a few extra minutes.
Q5: What is the best cheese to use?
A mix of cheddar and Monterey Jack gives the best balance of flavor and meltiness.
Q6: Can I make them in the air fryer?
Yes. Air fry at 400°F for 8 to 10 minutes, turning once, until golden and crisp.
Q7: Are these very spicy?
No. They have mild warmth from the chili powder and salsa, but they are not overly hot.
Q8: What dips go best with them?
Salsa, guacamole, and sour cream are all great choices. A creamy avocado dip is also delicious.
Q9: How do I reheat leftovers?
Use the oven or air fryer for the crispiest texture. Reheat until hot all the way through.
Q10: Can I use flour tortillas instead?
You can, though the texture will be a little different and the dish will no longer be gluten free.
Conclusion
This is the kind of meal that feels cheerful from the very first bite. It is crispy, cheesy, hearty, and so easy to make your own, which is probably why it disappears so fast every time. Whether you serve it for dinner, snacks, or a casual gathering, it brings big comfort with very little fuss. Trust me, once you make a batch, you’ll be thinking about the next one before the plate is even empty.
Print
Chicken and cheese taquitos
- Prep Time: 20 minutes
- Cook Time: 20 minutes
- Total Time: 40 minutes
- Yield: 5 servings
- Category: Main Course
- Method: Baked
- Cuisine: Mexican American
- Diet: Gluten Free
Description
Golden baked taquitos filled with shredded chicken, cheddar, Monterey Jack, cream cheese, salsa, and warm spices. Crispy on the outside and creamy on the inside, they are easy to make and perfect for dinner, snacks, or party platters.
Ingredients
- 2 cups cooked shredded chicken
- 1 cup shredded cheddar cheese
- 1 cup shredded Monterey Jack cheese
- 4 ounces cream cheese, softened
- 1/4 cup salsa
- 1 teaspoon chili powder
- 1/2 teaspoon garlic powder
- 1/2 teaspoon onion powder
- 1/2 teaspoon salt
- 1/4 teaspoon black pepper
- 10 small corn tortillas
- 1 tablespoon olive oil, for brushing
Instructions
- Preheat the oven to 425°F and line a baking sheet with parchment paper.
- In a medium bowl, mix the shredded chicken, cheddar cheese, Monterey Jack cheese, softened cream cheese, salsa, chili powder, garlic powder, onion powder, salt, and black pepper until well combined.
- Warm the corn tortillas for 20 to 30 seconds in the microwave under a damp paper towel, or heat them briefly in a dry skillet until flexible.
- Spoon about 3 tablespoons of filling onto the lower third of each tortilla and roll tightly.
- Place each rolled taquito seam-side down on the prepared baking sheet.
- Brush the tops lightly with olive oil.
- Bake for 18 to 22 minutes, until golden, crisp, and heated through.
- Let rest for 3 to 5 minutes, then serve warm.
Notes
- Warm tortillas before rolling to prevent cracking.
- Do not overfill the tortillas or they may burst while baking.
- For extra crispness, leave space between each taquito on the baking sheet.
- Serve with salsa, guacamole, or sour cream for dipping.
Nutrition
- Serving Size: 2 taquitos
- Calories: 430
- Sugar: 2g
- Sodium: 620mg
- Fat: 23g
- Saturated Fat: 11g
- Unsaturated Fat: 10g
- Trans Fat: 0g
- Carbohydrates: 21g
- Fiber: 3g
- Protein: 31g
- Cholesterol: 95mg