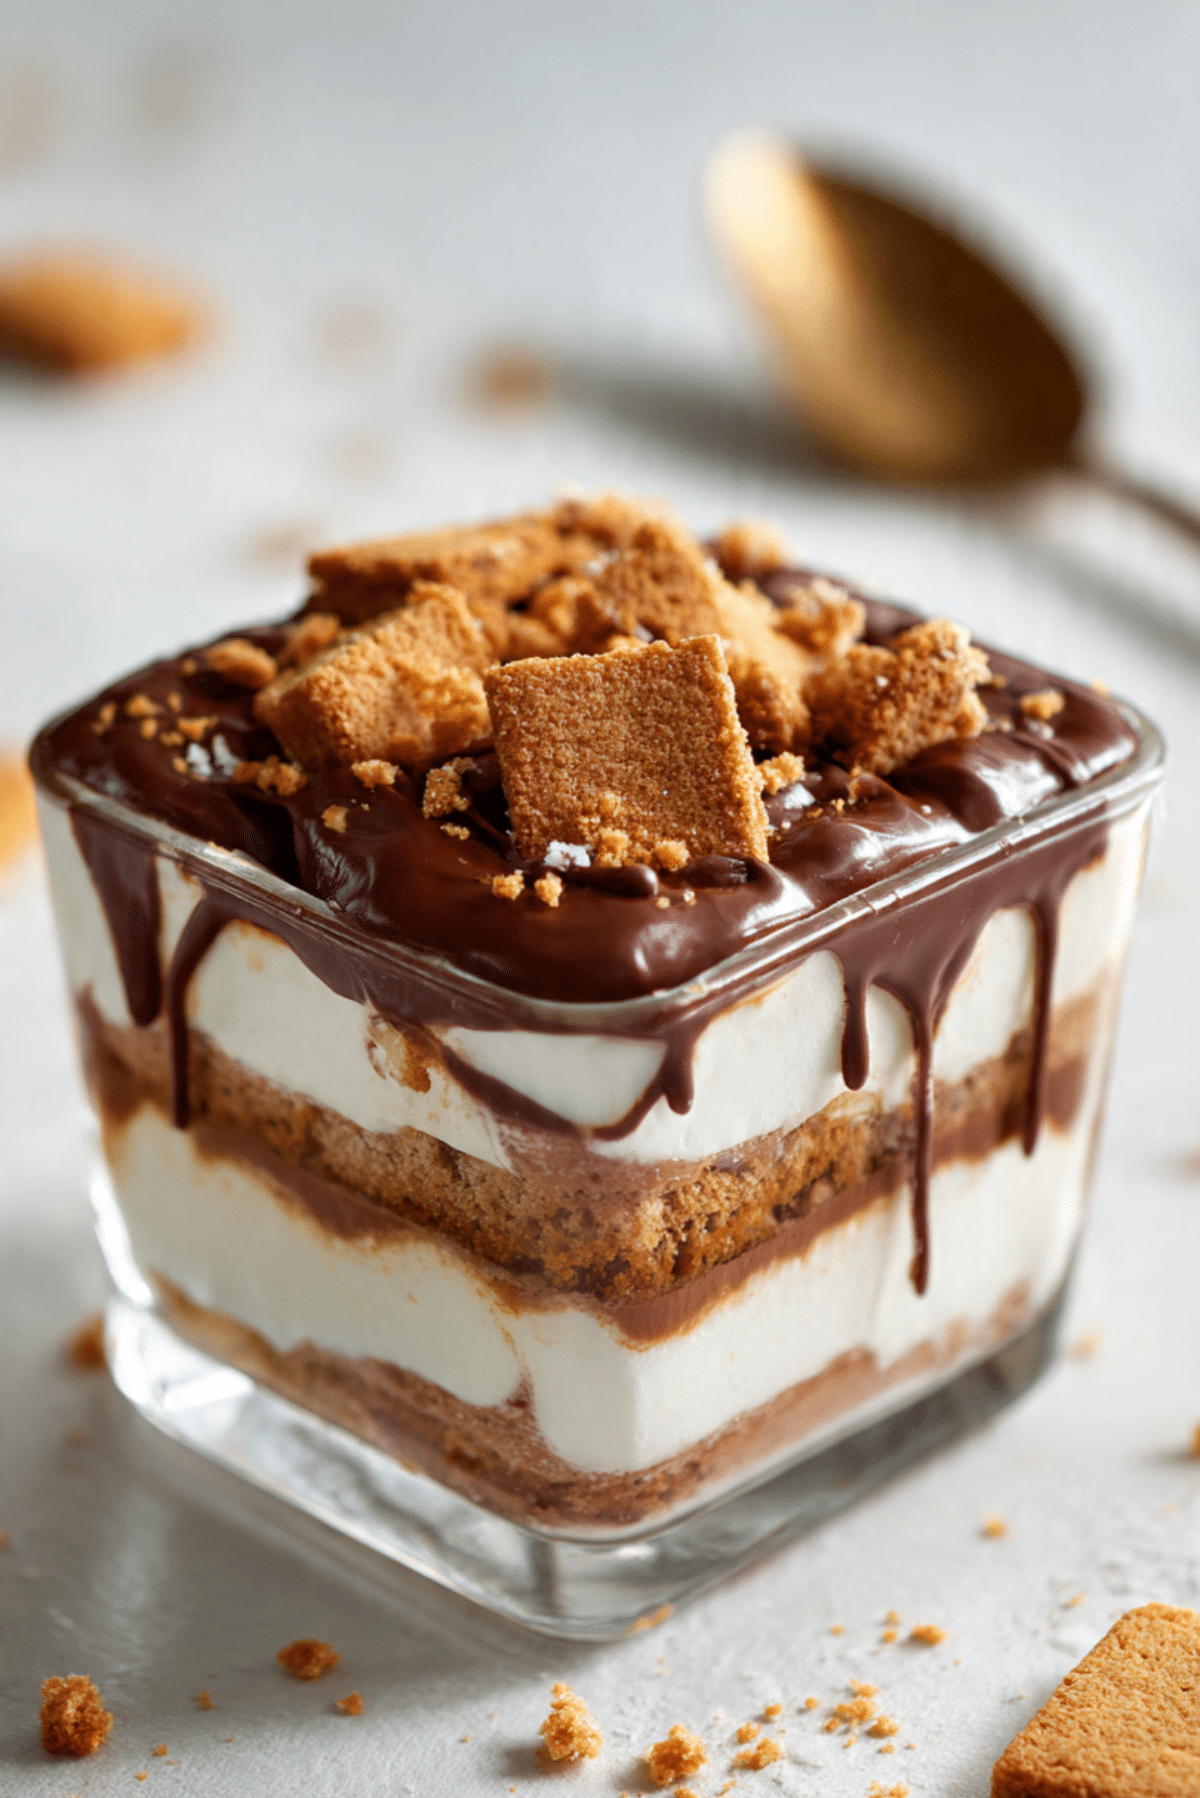
BUENO CRUNCH DESSERT
There are some desserts that do not just sit quietly on the table, they steal the whole scene. BUENO CRUNCH DESSERT is exactly that kind of treat. It is creamy, chocolatey, crunchy, and layered with the kind of texture that makes every spoonful feel exciting. You get silky filling, crisp wafer bites, soft whipped layers, and that deep chocolate hazelnut flavor that makes people go right back for another scoop. Trust me, you’re going to love this.
The Layered Treat Everyone Gets Excited About
Some sweets are lovely because they are simple, and some are unforgettable because they deliver a little bit of everything at once. This dessert falls into the second category. It brings together smooth cream, chocolate richness, and crisp crunch in a way that feels playful and indulgent, but still easy enough to make at home.
What makes it so lovable is the contrast. One spoonful gives you fluffy filling, the next gives you a crisp bite of wafer or biscuit, and then that chocolate hazelnut flavor ties it all together. This one’s a total game-changer for anyone who loves no-bake desserts that feel special without demanding too much work. And now let’s dive into where this style of dessert gets some of its charm.
A Modern No-Bake Favorite With Café Style Appeal
Layered chilled desserts like this have become incredibly popular because they combine comfort and presentation so effortlessly. While this version feels modern and a little luxurious, it borrows from a long tradition of no-bake desserts that use cream, cookies, and layered textures to create something satisfying and crowd-pleasing.
The chocolate hazelnut combination gives it that café-dessert personality, while the crunchy elements make it feel more playful and dramatic. It is the kind of dessert that looks lovely in a trifle dish, a square pan, or even individual cups, which is part of why it has become such a go-to for gatherings and celebrations.
Why This Dessert Is Always a Good Idea
Once you make it, it becomes pretty obvious why people keep coming back to it. It is rich without being fussy, impressive without being stressful, and easy to customize when you want to make it your own.
Versatile: You can serve it in a large dish for a family-style dessert, portion it into cups for parties, or dress it up in glasses for something that feels extra polished.
Budget-Friendly: Even though it tastes luxurious, most of the ingredients are easy to find and do not require anything complicated or expensive.
Quick and Easy: Since there is no baking involved, most of the work is just mixing, layering, and chilling. That makes it ideal for busy days.
Customizable: You can switch the biscuits, adjust the chocolate level, add a little extra hazelnut flavor, or make it prettier with simple toppings.
Crowd-Pleasing: Chocolate and crunch are a winning combination almost every time, and the creamy filling keeps it balanced and spoonable.
Make-Ahead Friendly: It actually benefits from chilling, which means you can prepare it in advance and let the fridge do the hard part.
Great for Leftovers: The flavors settle in beautifully, and the texture stays lovely for the next day or two.
Smart Tips That Make Every Layer Better
Before we get into the ingredients, a few little details can make a big difference in the final result. Since this dessert is all about texture, it helps to be thoughtful about how each layer comes together.
- Use cold cream for whipping: This helps the filling whip up more easily and gives you a lighter, fluffier texture.
- Fold gently: Once the whipped cream is combined with the other filling ingredients, gentle folding keeps the mixture airy.
- Do not crush everything too finely: You want real crunch in the biscuit and wafer layers, not dust.
- Chill before serving: This helps the layers settle, the flavors meld, and the texture become more satisfying.
- Save a little crunch for the top: That last layer adds a nice visual finish and lets everyone know exactly what kind of dessert they are diving into.
The Kitchen Tools You’ll Want Nearby
The good news is that this dessert does not need fancy equipment. A few simple tools are enough to make the whole process feel smooth and easy.
Mixing bowls: You will need one for the cream mixture and another if you want to organize the crunchy layers separately.
Electric hand mixer or stand mixer: This helps whip the cream quickly and gives the filling its light texture.
Rubber spatula: Perfect for folding the mixture gently and scraping every bit into the dish.
Measuring cups and spoons: Helpful for keeping the texture balanced and the sweetness right.
Food-safe serving dish or glass dish: A medium glass dish shows off the layers beautifully and makes serving easy.
Small spoon or offset spatula: Great for spreading each layer neatly without compressing it too much.
Ingredients That Build the Creamy Crunch
This dessert works because each ingredient brings something important to the final texture and flavor. The result is rich and satisfying, but still easy to put together.
- Heavy whipping cream: 2 cups, cold, this creates the fluffy creamy base and gives the dessert its luscious texture.
- Cream cheese: 8 ounces, softened, this adds body, a gentle tang, and structure to the filling.
- Sweetened condensed milk: 1 cup, this sweetens the dessert and makes the filling extra smooth and rich.
- Chocolate hazelnut spread: 3/4 cup, this brings the deep chocolate flavor and signature hazelnut richness.
- Vanilla extract: 1 teaspoon, this rounds out the sweetness and adds warmth.
- Crispy chocolate wafer bars: 6 bars, chopped, these add the unmistakable crunch and chocolatey bite.
- Digestive biscuits or graham crackers: 1 1/2 cups, crushed, these create a buttery crumb layer with extra texture.
- Unsalted butter: 4 tablespoons, melted, this helps bind the biscuit crumbs so they hold together nicely.
- Roasted hazelnuts: 1/2 cup, chopped, these reinforce the nutty flavor and add another crunchy layer.
- Chocolate chips: 1/3 cup, melted, this is used for a soft drizzle that makes the dessert feel extra indulgent.
- Cocoa powder: 1 tablespoon, optional, for a light dusting over the top that gives a pretty finish.
Flexible Swaps When You Want to Change It Up
The beauty of a chilled layered dessert is that it can bend a little without losing its charm. Here are some easy substitutions that still keep the spirit of the dish intact.
Cream cheese: Mascarpone can be used for an even softer, richer filling.
Sweetened condensed milk: You can use 3/4 cup powdered sugar in the cream cheese mixture instead, though the texture will be a bit different.
Digestive biscuits or graham crackers: Vanilla wafers or plain tea biscuits also work well.
Roasted hazelnuts: Chopped almonds or walnuts can be used if hazelnuts are not available.
Chocolate chips: A simple drizzle of extra chocolate hazelnut spread can replace the melted chocolate.
The Ingredients That Really Make It Memorable
When a dessert is built around texture and flavor contrasts, there are always one or two ingredients doing the heavy lifting. Here, a couple really stand out.
Chocolate hazelnut spread: This is the soul of the dessert. It delivers creamy sweetness, cocoa depth, and that nutty flavor that makes the whole thing feel rich and familiar.
Crispy chocolate wafer bars: These bring the crunch that makes each bite exciting. Without them, the dessert would still be creamy and good, but it would lose that playful texture that makes it so satisfying.

Let’s Layer It All Together
This is the fun part, where everything starts to come together and you can already tell the final result is going to be something worth chilling for. The process is easy, and each layer adds a little more anticipation.
- Preheat Your Equipment: No oven is needed, but chill a mixing bowl for the cream if you can, and set out a 9-inch square dish or a medium glass serving dish.
- Combine Ingredients: In one bowl, mix the crushed digestive biscuits or graham crackers with the melted butter until the crumbs are evenly coated. In another bowl, beat the softened cream cheese, sweetened condensed milk, chocolate hazelnut spread, and vanilla extract until smooth.
- Prepare Your Cooking Vessel: In a chilled bowl, whip the heavy cream until soft peaks form. Gently fold the whipped cream into the chocolate hazelnut cream cheese mixture until the filling is light, fluffy, and fully combined.
- Assemble the Dish: Press half of the biscuit mixture into the bottom of the dish. Spread half of the creamy filling over it. Scatter half of the chopped crispy wafer bars and half of the chopped hazelnuts over the cream. Repeat with the remaining biscuit mixture, filling, wafer pieces, and hazelnuts.
- Cook to Perfection: Since this is a no-bake dessert, perfection comes from the chill. Drizzle the melted chocolate over the top, cover the dish, and refrigerate for at least 4 hours so the layers can firm up and the flavors can settle together.
- Finishing Touches: Just before serving, dust lightly with cocoa powder if using, and add a few extra chopped wafer pieces on top for a fresh crunchy finish.
- Serve and Enjoy: Spoon into bowls or serve directly from the dish. Each serving should be creamy, crunchy, chocolatey, and just a little dramatic in the best way.
How the Texture and Flavor Build With Every Bite
The first thing you notice is the creaminess. It is soft and rich, almost mousse-like, with a smooth chocolate hazelnut flavor that melts easily on the tongue. Then the crunch arrives. The wafer pieces stay crisp enough to give the dessert personality, while the biscuit layers add a more buttery, crumbly bite.
That combination is what makes it feel so complete. It is sweet, but not flat. It is rich, but the crunch keeps it from feeling too heavy. The hazelnuts deepen the flavor, the chocolate drizzle adds a soft finish, and the whole thing becomes more balanced after a few hours in the fridge.
Small Tricks That Make a Big Difference
A few extra touches can take this from very good to absolutely irresistible.
- Let the cream cheese soften fully: This helps avoid lumps and gives you a smoother filling.
- Chop the wafer bars just before layering: That keeps them from softening too early.
- Use a glass dish if possible: It shows off the layers and makes the dessert feel even more inviting.
- Chill overnight for the best sliceable texture: A longer chill gives the cleanest scoops and the most settled flavor.
Common Mistakes to Skip
This dessert is forgiving, but a few things can affect the final texture if you are not careful.
- Overwhipping the cream: If it gets too stiff, the filling can become heavy instead of fluffy.
- Using warm ingredients where cold matters: Warm cream will not whip well, and that can flatten the texture.
- Crushing the wafer bars too early: They may lose some of their crunch if they sit too long before layering.
- Serving too soon: The dessert needs chill time to hold its layers properly and taste its best.
A Quick Look at the Nutrition
Now that we have covered the layers and texture, here is a general nutritional snapshot for planning purposes.
Servings: 10
Calories per serving: 430
Note: These are approximate values.
Timing That Makes Entertaining Easier
Another reason this dessert is such a favorite is that most of the time involved is hands-off chilling time.
Prep Time: 25 minutes
Cook Time: 0 minutes
Total Time: 4 hours 25 minutes
Make-Ahead and Storage Tips That Actually Help
This dessert was made for planning ahead. You can assemble it the night before and let it chill overnight, which makes it such a helpful option for parties, family dinners, and busy weekends.
Store it covered in the refrigerator for up to 3 days. The texture is best on the first and second day, when the filling is still fluffy and the crunch is still noticeable. Freezing is possible, but the texture of the cream may change slightly after thawing, so refrigeration is the better choice here. Serve it cold straight from the fridge, no reheating needed.
Easy Ways to Serve It Beautifully
This dessert already has a lot going for it, so serving can stay simple. Scoop it into small bowls for casual sharing, or serve it in clear dessert glasses if you want a more polished look. A little cocoa dusting on top adds a soft contrast, and a few extra chopped wafer pieces right before serving make it feel fresh and intentional.
It pairs nicely with coffee, hot chocolate, or even a simple glass of cold milk if you are keeping things cozy and classic. Since it is rich, smaller portions work beautifully.
Fun Ways to Reinvent Leftovers
Leftovers are not a problem here, they are an opportunity. Spoon some into little jars for grab-and-go treats, or layer it into parfait glasses with extra crushed biscuits for a new dessert moment.
You can also freeze small portions for a colder, firmer treat that feels almost like an icebox dessert. Another fun idea is to use a spoonful as a filling for mini dessert cups topped with extra cream and crunch.
Extra Pointers for the Best Final Result
If you want the best balance, taste the filling before layering and make sure it feels rich but not overly sweet. Since the wafers and chocolate topping add sweetness too, the whole dessert becomes more rounded once everything is layered together.
It also helps to hold back a little garnish until the very end. Fresh crunch on top gives the whole dish a more finished look and a more satisfying first bite.
Make It Look Like a Dessert Table Star
This dessert really shines when you let the layers show. Use a clear dish, keep the top neat, and add just enough garnish to make it pop without overcrowding it. A light cocoa dusting, a few chopped hazelnuts, and a small sprinkle of wafer pieces are more than enough.
If you are serving for a gathering, individual glasses can make it feel extra special. The layered effect looks lovely, and people always enjoy getting their own little dessert cup.
Variations to Try Next Time
Once you make the classic version, it is easy to imagine a few fun twists.
Mocha Crunch Version: Add 1 teaspoon instant espresso powder to the filling for a subtle coffee note that deepens the chocolate flavor.
Cookies and Cream Twist: Replace part of the biscuits with chocolate sandwich cookies for an even more indulgent crunch.
Dark Chocolate Version: Use dark chocolate chips for the drizzle and reduce the sweetness slightly for a more intense cocoa flavor.
Nut-Free Option: Leave out the hazelnuts and use extra biscuits or wafers for crunch while keeping the same layered feel.
Mini Cup Version: Layer everything into individual dessert cups for parties, showers, or easy portion control.
FAQ’s
Q1: Can I make this dessert a day ahead?
Yes, and it actually turns out beautifully when made ahead. The layers settle, the filling firms up, and serving becomes much easier.
Q2: Does it need to be baked at all?
No, this is a full no-bake dessert. The fridge does all the setting work for you.
Q3: Can I use store-bought whipped topping instead of whipped cream?
You can, but fresh whipped cream gives a lighter, more natural texture and better flavor.
Q4: How long does it last in the fridge?
It keeps well for up to 3 days when tightly covered and chilled properly.
Q5: Can I make it in individual cups?
Yes, and it works very well that way. It also makes serving easier for gatherings.
Q6: What if I do not have digestive biscuits?
Graham crackers, vanilla wafers, or plain tea biscuits all make good substitutes.
Q7: Will the wafer bars stay crunchy?
They soften a little over time, but if you add some on top just before serving, you will still get a nice crisp bite.
Q8: Can I freeze it?
You can freeze it in portions, but the creamy texture may change slightly after thawing. It is best enjoyed chilled from the fridge.
Q9: Is it very sweet?
It is definitely indulgent, but the cream cheese and crunch help balance the sweetness nicely.
Q10: Can I make it without nuts?
Yes, just leave out the hazelnuts and use more biscuits or wafer pieces for texture.
Conclusion
BUENO CRUNCH DESSERT is one of those treats that feels instantly exciting the moment you see the layers. It is creamy, crunchy, rich, and full of chocolate hazelnut flavor, with just enough contrast in every bite to keep it interesting. Let me tell you, it’s worth every bite. Make it once, chill it well, and you will have a dessert that looks impressive, tastes indulgent, and disappears fast.
Print
BUENO CRUNCH DESSERT
- Prep Time: 25 minutes
- Cook Time: 0 minutes
- Total Time: 4 hours 25 minutes
- Yield: 10 servings
- Category: Dessert
- Method: No-Bake
- Cuisine: International
- Diet: Vegetarian
Description
A rich no-bake layered dessert with fluffy chocolate hazelnut cream, buttery biscuit crumbs, crisp wafer pieces, chopped hazelnuts, and a soft chocolate drizzle. It is creamy, crunchy, and perfect for making ahead.
Ingredients
- 2 cups heavy whipping cream, cold
- 8 ounces cream cheese, softened
- 1 cup sweetened condensed milk
- 3/4 cup chocolate hazelnut spread
- 1 teaspoon vanilla extract
- 6 crispy chocolate wafer bars, chopped
- 1 1/2 cups digestive biscuits or graham crackers, crushed
- 4 tablespoons unsalted butter, melted
- 1/2 cup roasted hazelnuts, chopped
- 1/3 cup chocolate chips, melted
- 1 tablespoon cocoa powder, optional
Instructions
- Set out a 9-inch square dish or medium glass serving dish.
- Mix the crushed digestive biscuits or graham crackers with the melted butter until evenly coated.
- In a mixing bowl, beat the softened cream cheese, sweetened condensed milk, chocolate hazelnut spread, and vanilla extract until smooth.
- In a separate chilled bowl, whip the heavy cream until soft peaks form.
- Gently fold the whipped cream into the chocolate hazelnut mixture until light and fluffy.
- Press half of the biscuit mixture into the bottom of the dish.
- Spread half of the creamy filling over the biscuit layer.
- Scatter half of the chopped crispy wafer bars and half of the chopped hazelnuts over the filling.
- Repeat with the remaining biscuit mixture, remaining filling, remaining wafer bars, and remaining hazelnuts.
- Drizzle the melted chocolate over the top.
- Cover and refrigerate for at least 4 hours.
- Dust lightly with cocoa powder, if using, and serve chilled.
Notes
- Use cold heavy cream for the best whipped texture.
- Chop the wafer bars just before layering to keep them crisp.
- Let the cream cheese soften fully before mixing for a smooth filling.
- This dessert can be made one day ahead and kept refrigerated until serving.
Nutrition
- Serving Size: 1 serving
- Calories: 430
- Sugar: 26g
- Sodium: 160mg
- Fat: 31g
- Saturated Fat: 17g
- Unsaturated Fat: 11g
- Trans Fat: 0.3g
- Carbohydrates: 34g
- Fiber: 2g
- Protein: 6g
- Cholesterol: 68mg