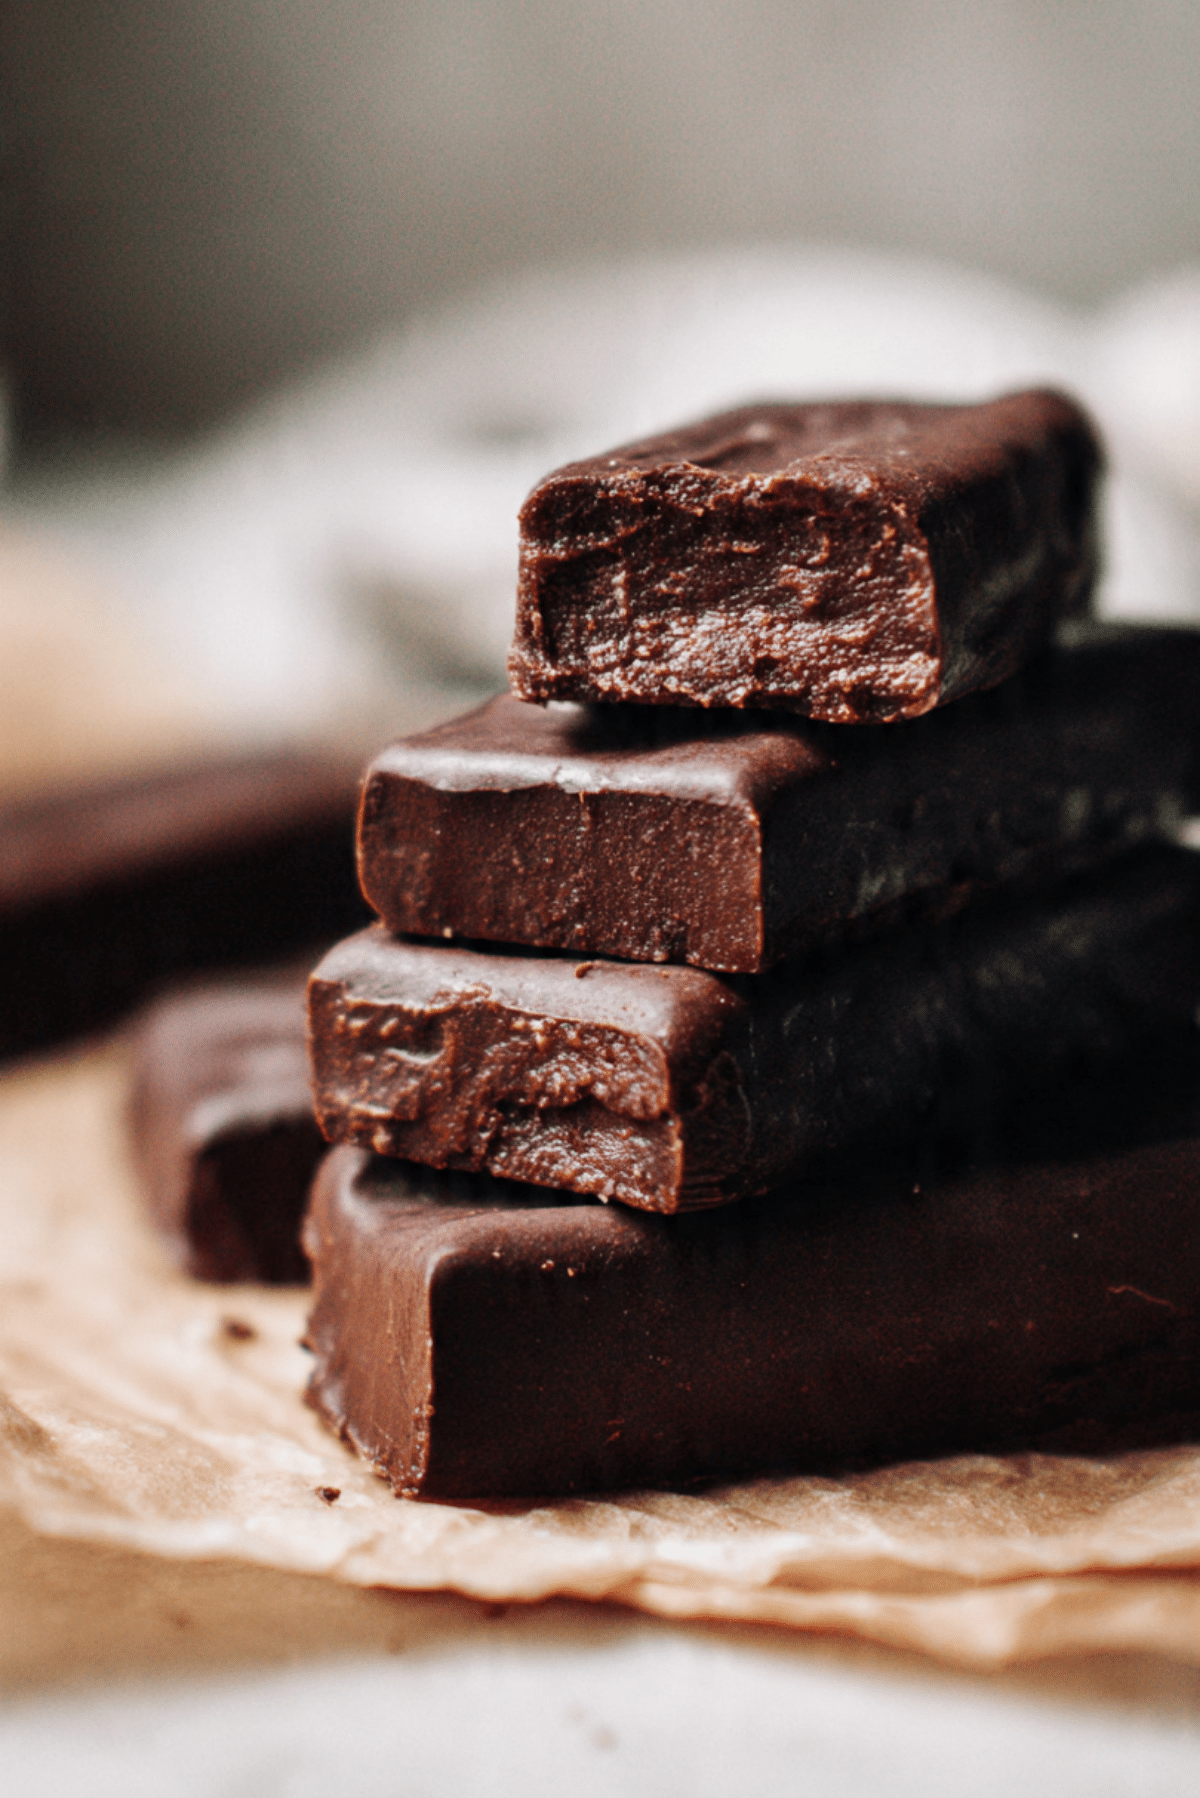
Vegan Bounty Bars
There is something so satisfying about biting into a thick chocolate shell and discovering a soft, sweet coconut center inside. These Vegan Bounty Bars bring that nostalgic candy bar feeling, but in a homemade, plant based version that feels even better. The rich dark chocolate snaps gently, the coconut filling is moist and tender, and every bite feels indulgent without being overly sweet. Trust me, you’re going to love this. They are simple, wholesome, and honestly a total game changer for anyone who loves coconut and chocolate together.
A Chocolate and Coconut Dream Come True
If you are a fan of that classic coconut candy bar, this version will quickly become a favorite. The coconut layer is soft and slightly chewy, naturally sweetened and packed with flavor. Once dipped in glossy melted dark chocolate, it turns into a decadent treat that feels bakery worthy. Let me tell you, it’s worth every bite. The contrast between the deep cocoa flavor and the bright coconut is pure magic.
Inspired by a Classic Candy Bar
The original coconut chocolate bar has been loved for decades, known for its simple combination of sweet coconut and milk chocolate. This homemade vegan twist keeps that familiar flavor but replaces dairy with plant based ingredients. By using coconut milk and maple syrup, you get the same creamy texture without compromising on taste. It is a modern take on a beloved classic.
Why You’ll Keep Making These
Once you see how easy they are, you will want to keep a batch in your freezer at all times.
Versatile: Enjoy them as a snack, dessert, or sweet afternoon treat.
Budget-Friendly: Made with just a handful of simple ingredients.
Quick and Easy: No baking required, just mix, shape, and chill.
Customizable: Adjust sweetness or use different chocolate varieties.
Crowd-Pleasing: Chocolate and coconut is a combination everyone loves.
Make-Ahead Friendly: Perfect for prepping ahead and storing in the freezer.
Great for Leftovers: They keep beautifully and taste even better chilled.
Pro Tips for Perfect Bars
Before we get started, here are a few helpful tips to ensure success.
- Use finely shredded coconut for a smoother texture.
- Chill the coconut mixture before shaping for easier handling.
- Freeze the bars before dipping in chocolate to keep their shape.
- Let the chocolate set fully before storing.
Tools You’ll Need
Simple tools make this recipe effortless.
Mixing Bowl: For combining the coconut filling.
Spatula: Helps mix everything evenly.
Baking Sheet: For placing shaped bars while chilling.
Parchment Paper: Prevents sticking and makes cleanup easy.
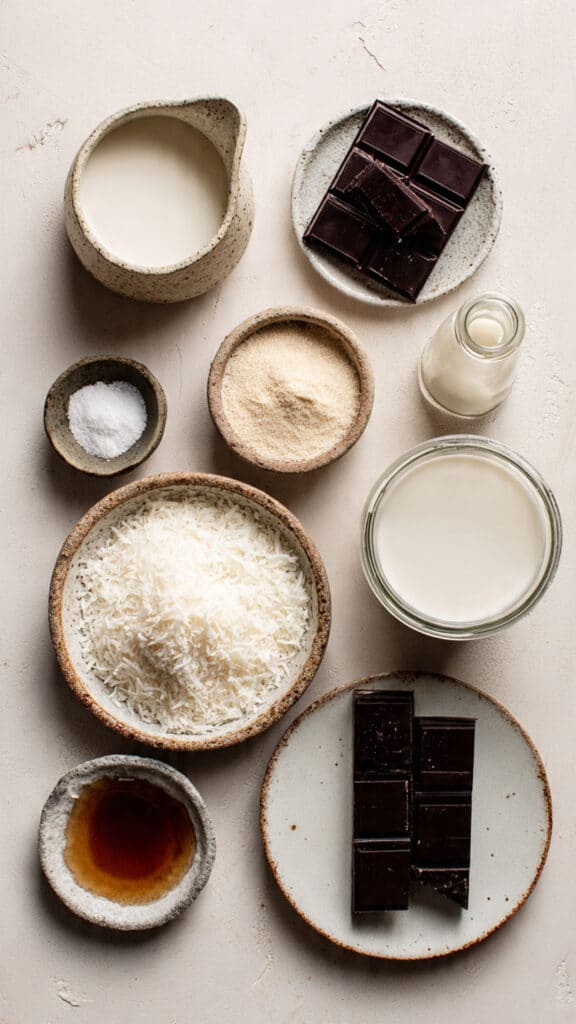
Ingredients That Make the Magic
Each ingredient plays an important role in texture and flavor.
- Unsweetened Shredded Coconut: 2 cups, 160 grams. Forms the base of the filling and gives structure.
- Coconut Milk: 1/2 cup, 120 milliliters, full fat. Adds moisture and creaminess.
- Maple Syrup: 1/4 cup, 60 milliliters. Naturally sweetens the mixture.
- Vanilla Extract: 1 teaspoon. Enhances sweetness and depth.
- Dark Chocolate: 200 grams, dairy free. Creates the rich outer coating.
- Coconut Oil: 1 tablespoon, 15 milliliters. Helps the chocolate melt smoothly and set with shine.
Easy Ingredient Swaps
Flexibility makes this recipe even more fun.
Maple Syrup: Agave syrup works as a substitute.
Dark Chocolate: Use semi sweet dairy free chocolate if preferred.
Coconut Milk: Thick coconut cream can create an even richer filling.
Spotlight on Coconut
Unsweetened Shredded Coconut: It gives that signature chewy texture and natural sweetness. Using unsweetened allows you to control the flavor balance perfectly.
Let’s Make Them Step by Step
Now let’s turn these simple ingredients into irresistible bars.
- Preheat Your Equipment: No oven needed, line a baking sheet with parchment paper.
- Combine Ingredients: In a large bowl, mix shredded coconut, coconut milk, maple syrup, and vanilla extract until fully combined and sticky.
- Prepare Your Cooking Vessel: Chill the mixture in the refrigerator for 20 minutes to firm up.
- Assemble the Dish: Shape the mixture into small rectangular bars and place them on the prepared baking sheet.
- Cook to Perfection: Freeze the bars for 30 minutes until solid.
- Finishing Touches: Melt dark chocolate with coconut oil until smooth. Dip each frozen bar into the melted chocolate, coating completely. Place back on parchment and allow chocolate to set.
- Serve and Enjoy: Once the chocolate is firm, enjoy straight from the fridge or freezer.
Texture and Flavor Harmony
The outer shell gives a gentle snap while the inside stays soft and moist. The maple syrup adds subtle sweetness, the coconut milk creates creaminess, and the dark chocolate balances everything with rich depth. Each bite delivers contrast and comfort at the same time.
Helpful Tips for Best Results
A few extra details make a difference.
- Work quickly when dipping to prevent bars from softening.
- Use a fork to lift bars from chocolate for even coating.
- Store chilled to maintain firmness.
What to Avoid
Even simple no bake recipes have small pitfalls.
- Do not skip chilling before shaping, it helps hold structure.
- Avoid overheating chocolate, melt gently to prevent grainy texture.
- Do not leave bars at room temperature too long.
Nutrition Snapshot
Servings: 10 bars
Calories per serving: Approximately 220
Note: These are approximate values.
Time Breakdown
Prep Time: 15 minutes
Cook Time: 0 minutes
Total Time: 45 minutes, including chilling
Make Ahead and Storage Tips
Store bars in an airtight container in the refrigerator for up to one week. For longer storage, keep them in the freezer for up to two months. They taste delicious slightly chilled and hold their shape best when cold.
How to Serve Them
Serve straight from the fridge for a firm bite, or let them sit for a few minutes for a softer texture. They pair beautifully with coffee or tea.
Creative Leftover Transformations
Chop them into small pieces and mix into dairy free ice cream. Crumble over smoothie bowls for a chocolate coconut crunch. Slice into bite sized cubes for party platters.
Extra Tips for Flavor Boost
Add a tiny pinch of sea salt on top before the chocolate sets. Stir a tablespoon of cocoa powder into the coconut mixture for a double chocolate twist.
Make Them Look Professional
Drizzle a little extra melted chocolate in thin lines across the top for decoration. Sprinkle a few coconut flakes before the coating sets for a beautiful finish.
Variations to Try
- Add chopped almonds inside for crunch.
- Use white dairy free chocolate for a different look.
- Dip only half of each bar for a decorative effect.
- Add orange zest to the coconut mixture for a citrus hint.
FAQ’s
Q1: Can I use sweetened coconut?
Yes, but reduce the maple syrup slightly to balance sweetness.
Q2: Can I freeze them long term?
Yes, they freeze beautifully for up to two months.
Q3: Why is my filling too soft?
Add a bit more shredded coconut to firm it up.
Q4: Can I skip coconut oil?
You can, but it helps create a smoother chocolate coating.
Q5: Are they very sweet?
They are moderately sweet with rich chocolate balance.
Q6: Can I make them smaller?
Yes, shape into bite sized pieces.
Q7: What chocolate works best?
A good quality dairy free dark chocolate melts smoothly.
Q8: Do I need to temper the chocolate?
No, simply melting works well for this recipe.
Q9: Can I add protein powder?
Yes, a small amount can be mixed into the coconut filling.
Q10: How do I keep the chocolate shiny?
Adding coconut oil helps maintain a glossy finish.
Conclusion
Vegan Bounty Bars prove that homemade treats can be simple, wholesome, and incredibly satisfying. With just a few ingredients and no baking required, you get a rich chocolate shell and a tender coconut center that feels nostalgic yet fresh. Once you make them, you may never go back to store bought versions. Let me tell you, they are absolutely worth it.
Print
Vegan Bounty Bars
- Prep Time: 15 minutes
- Cook Time: 0 minutes
- Total Time: 45 minutes
- Yield: 10 bars
- Category: Dessert
- Method: No Bake
- Cuisine: International
- Diet: Vegan
Description
Homemade vegan bounty bars with a soft coconut filling and a rich dark chocolate coating. A simple no bake treat made with wholesome plant based ingredients.
Ingredients
- 2 cups (160 g) unsweetened shredded coconut
- 1/2 cup (120 ml) full fat coconut milk
- 1/4 cup (60 ml) maple syrup
- 1 teaspoon vanilla extract
- 200 g dairy free dark chocolate
- 1 tablespoon (15 ml) coconut oil
Instructions
- Line a baking sheet with parchment paper.
- In a large mixing bowl, combine shredded coconut, coconut milk, maple syrup, and vanilla extract. Mix until sticky and well combined.
- Refrigerate the mixture for 20 minutes to firm up.
- Shape the mixture into 10 small rectangular bars and place them on the prepared baking sheet.
- Freeze the bars for 30 minutes until solid.
- Melt the dark chocolate with coconut oil in a heatproof bowl until smooth.
- Dip each frozen bar into the melted chocolate, coating completely, then place back on the parchment paper.
- Allow the chocolate to set at room temperature or refrigerate until firm.
- Store chilled and serve straight from the refrigerator or freezer.
Notes
- Use finely shredded coconut for a smoother texture.
- Work quickly when dipping to prevent the bars from softening.
- Store in an airtight container in the refrigerator for up to one week or freeze for up to two months.
Nutrition
- Serving Size: 1 bar
- Calories: 220
- Sugar: 12 g
- Sodium: 25 mg
- Fat: 17 g
- Saturated Fat: 14 g
- Unsaturated Fat: 2 g
- Trans Fat: 0 g
- Carbohydrates: 16 g
- Fiber: 3 g
- Protein: 2 g
- Cholesterol: 0 mg