Lazy Cat Cake aka Chocolate Crunch Cake
There are days when you want something deeply chocolatey, creamy, and a little bit dramatic, but you do not want to spend hours in the kitchen. That is exactly where Lazy Cat Cake aka Chocolate Crunch Cake steps in. It is layered, rich, and unapologetically indulgent. The bottom is moist and fudgy, the center is smooth and creamy, and the top is covered in crunchy chocolate cereal that gives every bite a satisfying texture. Trust me, you are going to love this. It looks impressive, tastes incredible, and honestly, it is worth every bite.
The No Fuss Chocolate Dessert That Always Disappears First
This cake has that magical combination of textures that makes people go back for seconds. The soft chocolate base soaks up just enough richness, the creamy middle layer adds a cool contrast, and the crunchy topping brings that final snap. It is sweet but balanced, rich but not overwhelming. It feels like something you would find in a bakery window, yet it is completely doable at home.
The Story Behind This Playful Name
The name Lazy Cat Cake comes from its effortless nature. It is the kind of dessert you can assemble without complicated techniques or fancy tools. Much like a lazy afternoon, it is relaxed and comforting.
Layered chocolate desserts have long been a favorite in American kitchens, especially for potlucks and family gatherings. This version adds chocolate crunch cereal on top, giving it a nostalgic twist that feels both classic and modern.
Why This Recipe Is a Chocolate Lover’s Dream
Before we dive into mixing and layering, here is why this dessert works every single time.
Versatile: Serve it chilled for a firm slice or slightly softened for a gooier texture.
Budget-Friendly: Uses pantry staples and simple ingredients.
Quick and Easy: No complicated decorating or advanced baking skills required.
Customizable: Swap the cereal topping or adjust the chocolate intensity.
Crowd-Pleasing: The layered look and crunchy topping win everyone over.
Make-Ahead Friendly: Prepare it a day in advance for even better flavor.
Great for Leftovers: The layers hold beautifully in the fridge for days.
Pro Tips for Perfect Layers
A few thoughtful details will take this from good to unforgettable.
- Allow the cake base to cool completely before adding the creamy layer.
- Spread each layer evenly for clean, beautiful slices.
- Chill the dessert for at least 2 hours to help the layers set.
- Use a sharp knife and wipe it clean between slices for neat presentation.
Kitchen Tools That Make It Easy
Having everything ready makes the process smooth and stress free.
9×13 Inch Baking Dish: Perfect for building sturdy layers.
Mixing Bowls: One for cake batter and one for cream filling.
Hand Mixer: Helps create a smooth and fluffy filling.
Spatula: Essential for spreading layers evenly.
Saucepan: For melting chocolate and butter smoothly.
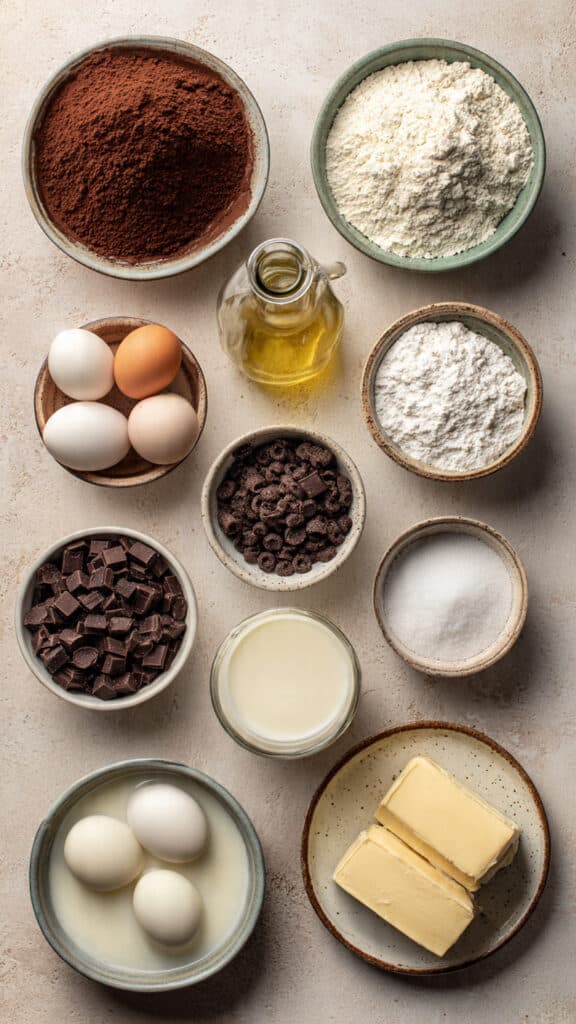
Ingredients You Will Need for Lazy Cat Cake aka Chocolate Crunch Cake
Each ingredient contributes to that rich, layered texture.
- Chocolate Cake Mix: 1 standard box, about 15.25 ounces, forms the moist base.
- Large Eggs: 3 whole eggs, bind the cake batter.
- Vegetable Oil: 1/2 cup, keeps the cake tender.
- Milk: 1 cup, adds moisture and richness.
- Unsalted Butter: 1/2 cup, melted, enhances flavor.
- Semi Sweet Chocolate Chips: 1 cup, melted for added chocolate depth.
- Heavy Cream: 1 cup, creates a silky filling.
- Powdered Sugar: 1 cup, sweetens the creamy layer.
- Unsweetened Cocoa Powder: 2 tablespoons, intensifies chocolate flavor.
- Chocolate Crunch Cereal: 2 cups, adds the signature crunchy topping.
Easy Ingredient Swaps
Baking should feel flexible, so here are simple adjustments.
Chocolate Cake Mix: Use homemade chocolate cake batter if preferred.
Semi Sweet Chocolate Chips: Dark chocolate chips give a deeper flavor.
Chocolate Crunch Cereal: Substitute with crushed chocolate cookies for a similar crunch.
Spotlight on the Star Ingredients
Let us highlight what makes this dessert special.
Chocolate Crunch Cereal: It adds texture that contrasts beautifully with the soft layers below.
Heavy Cream: Whipped into the filling, it creates a smooth, almost mousse like center.
Let Us Build This Chocolate Masterpiece
Now your kitchen will start smelling like pure chocolate comfort.
- Preheat Your Equipment: Preheat oven to 350 degrees Fahrenheit and grease a 9×13 inch baking dish.
- Combine Ingredients: In a large bowl, mix chocolate cake mix, eggs, vegetable oil, and milk until smooth.
- Prepare Your Cooking Vessel: Pour the batter into the prepared baking dish and spread evenly.
- Assemble the Dish: Bake for 25 to 30 minutes until a toothpick inserted in the center comes out clean. Let cool completely.
- Cook to Perfection: In a saucepan over low heat, melt butter and chocolate chips together until smooth. Stir in cocoa powder. Let cool slightly.
- Finishing Touches: In a separate bowl, whip heavy cream and powdered sugar until fluffy. Spread over cooled cake. Pour the melted chocolate mixture gently over the cream layer and sprinkle evenly with chocolate crunch cereal. Chill for at least 2 hours.
- Serve and Enjoy: Slice into squares and serve chilled for the best texture contrast.
Texture and Flavor Harmony
The base is moist and tender. The creamy layer is smooth and slightly airy. The chocolate topping adds richness, and the cereal delivers crunch. Each bite moves from soft to creamy to crisp, creating a layered chocolate experience that feels indulgent yet playful.
Helpful Tips for Success
A few small steps make a big difference.
- Let each layer cool before adding the next.
- Chill thoroughly to help the layers hold together.
- Use high quality chocolate for richer flavor.
What to Avoid
Even simple desserts need a little care.
- Skipping chill time can cause messy slices.
- Overmixing the cake batter may make it dense.
- Adding hot chocolate over the cream layer can cause melting.
Nutritional Overview
Servings: 12
Calories per serving: 450
Note: These values are approximate.
Time Breakdown
Prep Time: 20 minutes
Cook Time: 30 minutes
Total Time: 2 hours 50 minutes including chilling
Make Ahead and Storage Tips
This dessert actually improves after a night in the refrigerator. Store covered in the fridge for up to 4 days. For longer storage, freeze individual slices wrapped tightly for up to 2 months. Thaw in the refrigerator before serving.
Serving Ideas
Serve chilled for clean layers or slightly softened for a creamier texture. Pair with a glass of cold milk or a cup of coffee for a balanced sweetness.
Creative Leftover Transformations
Layer leftover pieces into dessert cups with whipped cream for mini trifles. Crumble over vanilla ice cream for a quick sundae topping.
Additional Helpful Advice
Measure ingredients carefully for balanced sweetness. Spread each layer evenly for a professional look. Always chill thoroughly before slicing.
Make It a Showstopper
Serve in a clear glass dish to highlight the layers. Add a light dusting of cocoa powder right before serving for extra visual appeal.
Variations to Try
- Add a thin layer of peanut butter between cake and cream.
- Stir chopped nuts into the cereal topping.
- Use white chocolate chips for a different flavor profile.
- Add a drizzle of caramel sauce on top.
- Mix crushed cookies into the cream layer for extra texture.
FAQ’s
Q1: Can I make this ahead of time?
Yes, it is even better the next day.
Q2: Can I use homemade cake instead of a mix?
Absolutely, any moist chocolate cake works well.
Q3: How do I keep layers neat?
Chill thoroughly and slice with a sharp knife.
Q4: Can I freeze it?
Yes, wrap slices tightly and freeze up to 2 months.
Q5: Does it have to be refrigerated?
Yes, because of the cream layer.
Q6: Can I use milk chocolate instead?
Yes, but it will be slightly sweeter.
Q7: Can I skip the cereal?
You can, but it adds the signature crunch.
Q8: How long does it last in the fridge?
Up to 4 days when stored properly.
Q9: Can I make it in a smaller pan?
Yes, but adjust baking time accordingly.
Q10: Is it very sweet?
It is rich and sweet, but balanced by the cocoa.
Conclusion
Lazy Cat Cake aka Chocolate Crunch Cake is layered, rich, and full of texture. From the moist chocolate base to the creamy middle and crunchy topping, every bite feels indulgent and satisfying. Whether you are making it for a party or just because you are craving chocolate, this dessert delivers comfort and flavor every single time.
Print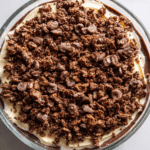
Lazy Cat Cake aka Chocolate Crunch Cake
- Prep Time: 20 minutes
- Cook Time: 30 minutes
- Total Time: 2 hours 50 minutes
- Yield: 12 servings
- Category: Dessert
- Method: Baking
- Cuisine: American
- Diet: Vegetarian
Description
Lazy Cat Cake aka Chocolate Crunch Cake is a rich layered chocolate dessert with a moist cake base, fluffy cream filling, silky melted chocolate topping, and a crunchy chocolate cereal finish. This easy make-ahead treat delivers bold chocolate flavor and irresistible texture in every bite.
Ingredients
- 1 standard box chocolate cake mix, about 15.25 ounces
- 3 large eggs
- 1/2 cup vegetable oil
- 1 cup milk
- 1/2 cup unsalted butter, melted
- 1 cup semi sweet chocolate chips
- 2 tablespoons unsweetened cocoa powder
- 1 cup heavy cream
- 1 cup powdered sugar
- 2 cups chocolate crunch cereal
Instructions
- Preheat oven to 350 degrees Fahrenheit and grease a 9×13 inch baking dish.
- In a large bowl, combine chocolate cake mix, eggs, vegetable oil, and milk. Mix until smooth.
- Pour batter into the prepared baking dish and spread evenly.
- Bake for 25 to 30 minutes, or until a toothpick inserted in the center comes out clean. Allow the cake to cool completely.
- In a saucepan over low heat, melt unsalted butter and semi sweet chocolate chips together until smooth. Stir in cocoa powder and remove from heat. Let cool slightly.
- In a separate bowl, whip heavy cream and powdered sugar until fluffy and spreadable.
- Spread the whipped cream mixture evenly over the cooled cake.
- Pour the melted chocolate mixture gently over the cream layer and spread evenly.
- Sprinkle chocolate crunch cereal evenly over the top.
- Refrigerate for at least 2 hours until fully set before slicing into 12 servings.
Notes
- Allow the cake to cool fully before adding the cream layer to prevent melting.
- Chill thoroughly for clean slices and defined layers.
- Store covered in the refrigerator for up to 4 days.
- Freeze individual slices tightly wrapped for up to 2 months.
Nutrition
- Serving Size: 1 slice
- Calories: 450
- Sugar: 36g
- Sodium: 380mg
- Fat: 24g
- Saturated Fat: 13g
- Unsaturated Fat: 9g
- Trans Fat: 0g
- Carbohydrates: 55g
- Fiber: 2g
- Protein: 6g
- Cholesterol: 85mg