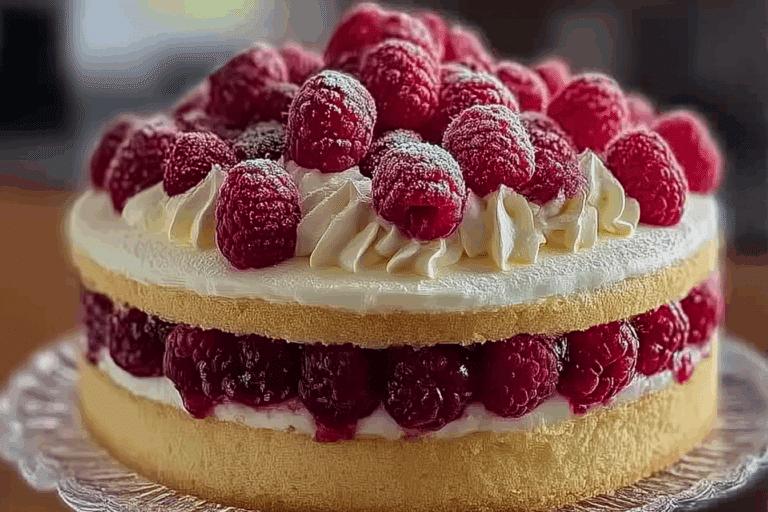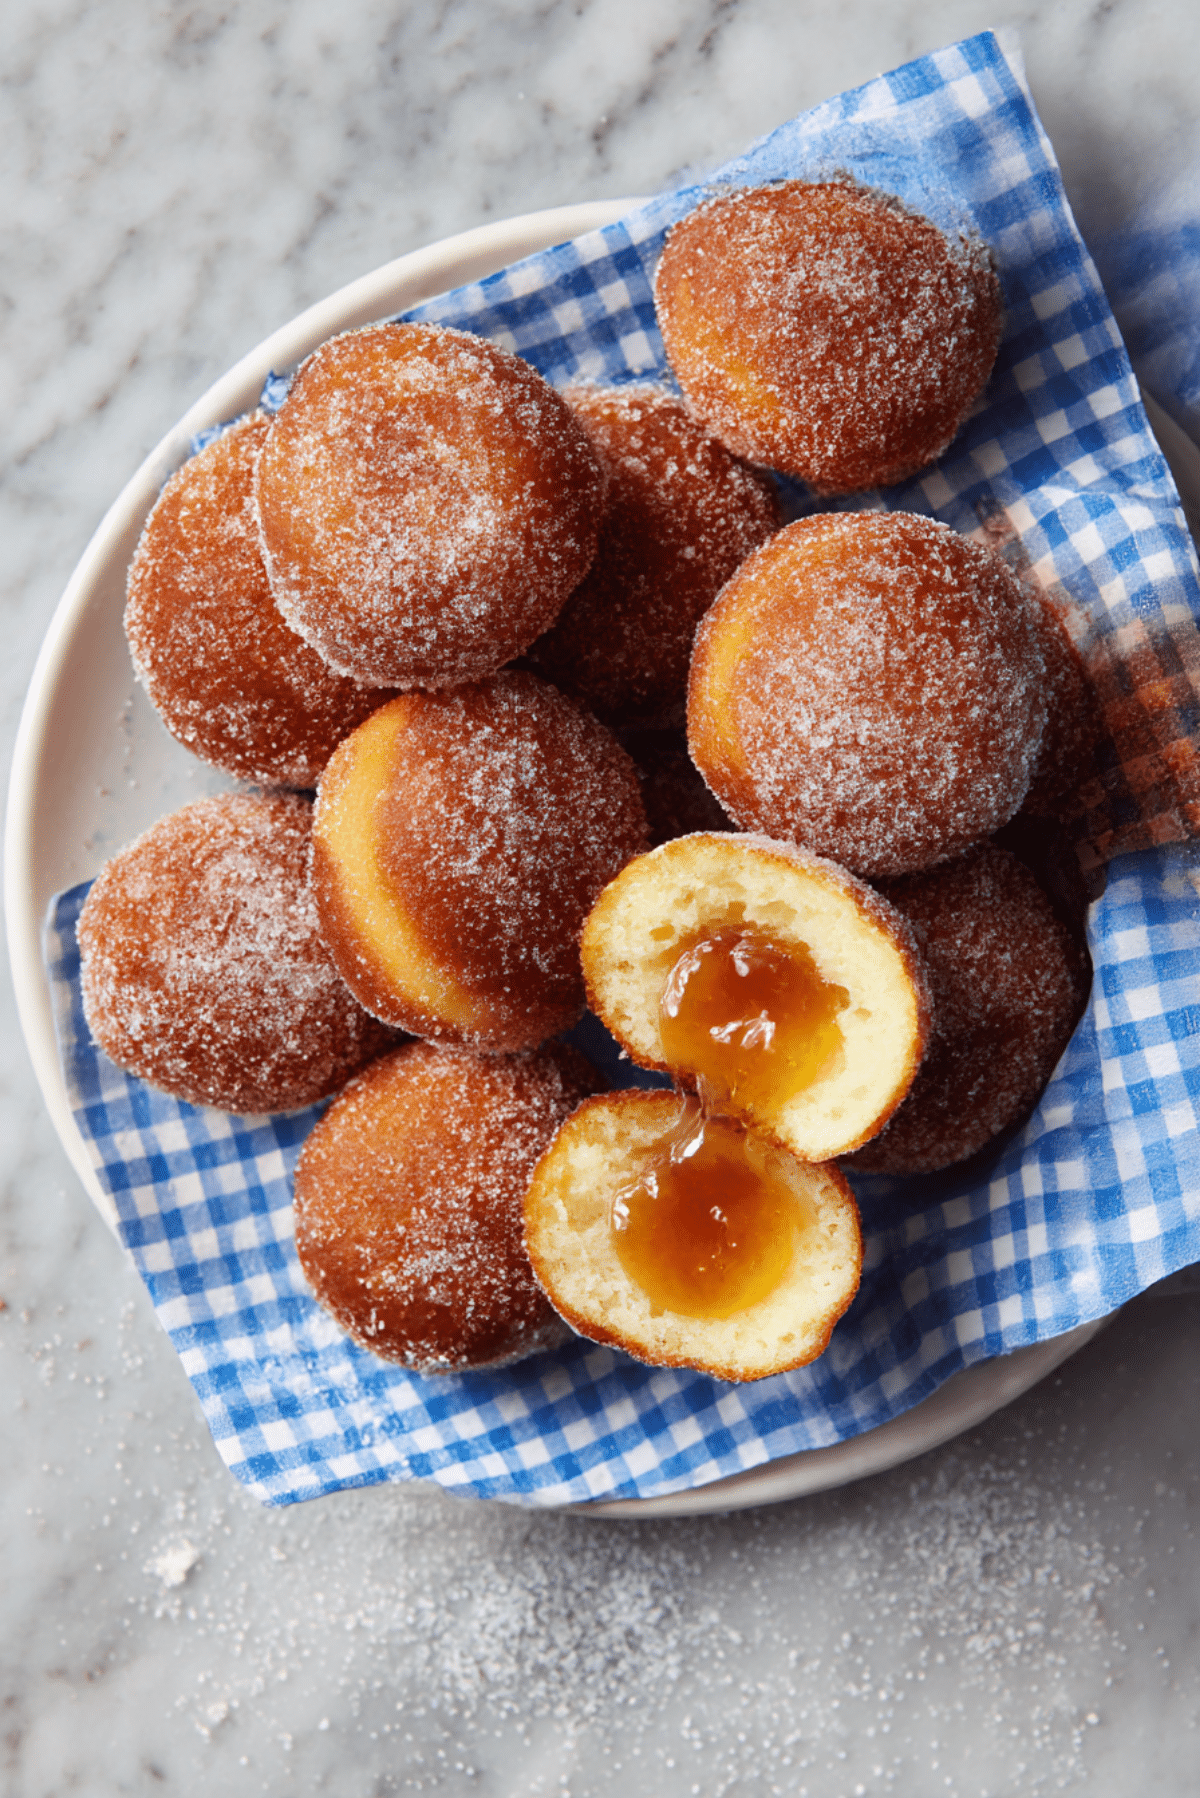
Jelly Doughnuts
There’s something undeniably joyful about biting into a fluffy, sugar-dusted doughnut and discovering that sweet, sticky jelly surprise at the center. Jelly Doughnuts are more than just a treat, they’re an experience. From the pillowy texture to the fruity burst of filling, every bite brings comfort and just the right amount of indulgence. Whether you’re enjoying them with a morning coffee or passing around a tray at brunch, these doughnuts always steal the spotlight.
Behind the Recipe
My love for jelly doughnuts started early, during family breakfasts when a bakery box would show up on the kitchen counter. I always reached for the doughnut with that tiny dot of jelly peeking out, hoping it was raspberry, my favorite. As I got older, I wanted to recreate that magic at home — warm, fresh, and bursting with flavor. After countless batches, this version finally hit all the right notes: soft dough, not too sweet, with a sparkle of sugar on the outside and a big jelly payoff in the middle.
Recipe Origin or Trivia
Jelly doughnuts have been around for centuries and appear in various cultures under different names. In Germany, they’re called Berliner, in Poland, Pączki, and in Israel, they’re the beloved Sufganiyot enjoyed during Hanukkah. Though fillings vary by region — some use custard, some chocolate — fruit jelly remains the classic. This recipe is inspired by the traditional European approach but simplified for your home kitchen.
Why You’ll Love Jelly Doughnuts
This recipe captures the heart of what makes doughnuts so irresistible while keeping things easy enough for a weekend bake.
Versatile: You can fill them with any jam or jelly you like — from strawberry to lemon curd.
Budget-Friendly: Uses everyday ingredients you likely already have.
Quick and Easy: Quicker than you’d think for a yeast-based recipe.
Customizable: Try flavored sugars, different fillings, or even glaze instead of sugar coating.
Crowd-Pleasing: Who doesn’t love a fresh, warm doughnut?
Make-Ahead Friendly: Make the dough the night before and fry in the morning.
Great for Leftovers: Store well and taste great reheated.
Chef’s Pro Tips for Perfect Results
Want bakery-quality doughnuts at home? Here’s how:
- Use warm milk (not hot) to activate the yeast without killing it.
- Don’t skip the first rise. Let the dough double in size for the best texture.
- Fry at the right temp — 350°F is your sweet spot.
- Use a piping bag for clean, even jelly filling.
- Roll in sugar while doughnuts are still warm so it sticks perfectly.
Kitchen Tools You’ll Need
You don’t need a fancy setup — just these essentials:
Mixing Bowls: For combining and rising the dough.
Stand Mixer or Hand Mixer: Makes kneading easier, but hands work too.
Rolling Pin: To flatten the dough evenly before cutting.
Round Cutter: A biscuit or cookie cutter works great.
Thermometer: Keeps oil at the perfect frying temperature.
Slotted Spoon: For safe and easy flipping and lifting from oil.
Piping Bag with Tip: To fill the doughnuts cleanly and efficiently.
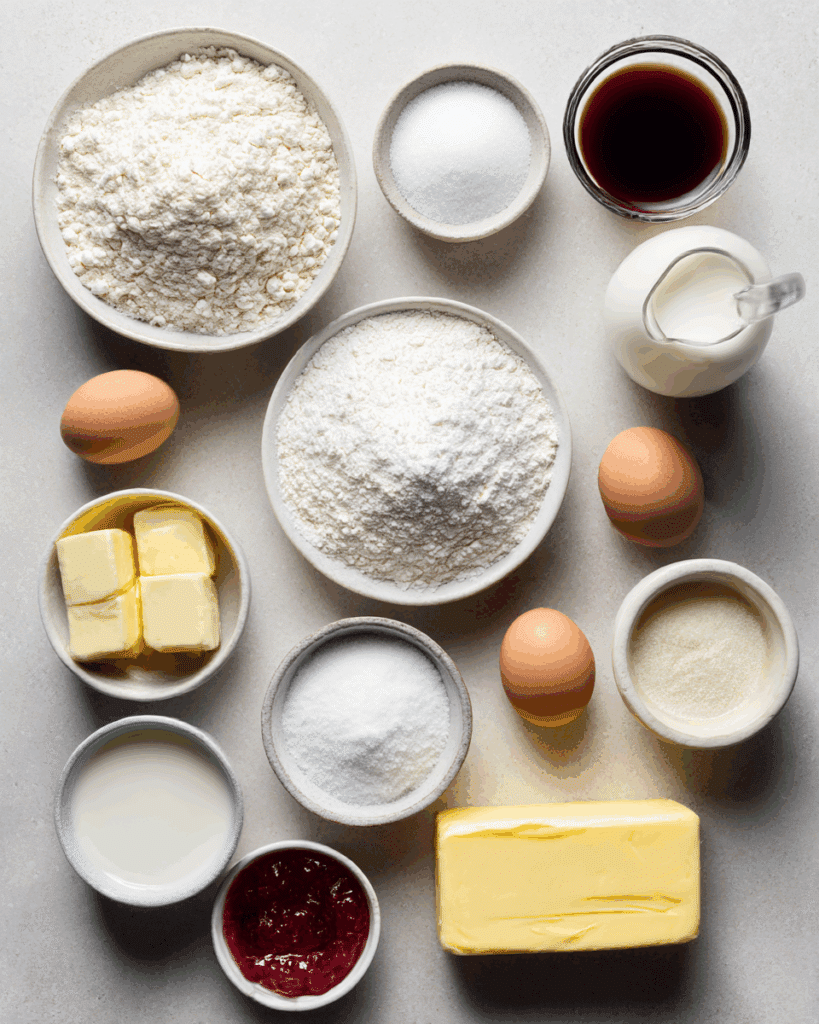
Ingredients in Jelly Doughnuts
Each ingredient has a purpose, coming together to create soft, flavorful, golden-fried perfection.
- All-Purpose Flour: 3 1/2 cups – Provides structure and elasticity to the dough.
- Granulated Sugar: 1/4 cup – Adds sweetness and helps with browning.
- Active Dry Yeast: 2 1/4 teaspoons (1 packet) – The lift that gives doughnuts their airy texture.
- Salt: 1/2 teaspoon – Balances sweetness and enhances flavor.
- Whole Milk: 3/4 cup – Activates yeast and enriches the dough.
- Unsalted Butter: 1/4 cup (melted) – Adds richness and tenderness.
- Eggs: 2 large – Give structure and a soft, cakey texture.
- Vanilla Extract: 1 teaspoon – Brings warmth and rounds out the flavor.
- Vegetable Oil: For frying – Neutral oil that crisps without overpowering.
- Fruit Jelly or Jam: About 3/4 cup – The sweet, fruity star at the center.
Ingredient Substitutions
Need to make some changes? These swaps work well:
Whole Milk: Use 2% or dairy-free alternatives like oat or almond milk.
Active Dry Yeast: Use instant yeast (same amount) and skip proofing.
Butter: Try coconut oil or margarine.
Eggs: Use 1/4 cup applesauce or a flax egg per egg.
Vegetable Oil: Canola or sunflower oil are great alternatives.
Fruit Jelly: Use jam, curd, or even Nutella.
Ingredient Spotlight
Yeast: A living organism that brings the dough to life — literally. Activated with warm milk and sugar, it creates the airy texture we crave in doughnuts.
Fruit Jelly: Whether you go classic raspberry, strawberry, or something unique like apricot or blackberry, the filling adds moisture and a flavor burst in every bite.
Instructions for Making Jelly Doughnuts
Now the fun begins. Follow these steps and you’ll have warm, sugary pillows ready to impress.
- Preheat Your Equipment:
No oven needed here, but make sure your oil heats to 350°F (175°C) in a heavy-bottomed pot or deep fryer. Line a cooling rack with paper towels. - Combine Ingredients:
In a bowl, warm the milk until just slightly warm. Stir in sugar and yeast. Let sit 5–10 minutes until bubbly. In a large bowl, whisk flour and salt. Add yeast mixture, eggs, vanilla, and melted butter. Mix until dough forms. - Prepare Your Cooking Vessel:
Turn dough onto a floured surface. Knead 5–8 minutes until smooth. Place in a greased bowl, cover, and let rise in a warm place for about 1 hour or until doubled. - Assemble the Dish:
Punch down dough and roll to about 1/2-inch thick. Cut circles using a 3-inch cutter. Place on a floured tray, cover lightly, and let rise another 30 minutes. - Cook to Perfection:
Heat oil to 350°F. Carefully lower a few doughnuts at a time into the hot oil. Fry 1–2 minutes per side or until golden brown. Remove with slotted spoon and drain on paper towels. - Finishing Touches:
While still warm, roll doughnuts in granulated sugar until well coated. Once cool, use a piping bag to fill each with jelly, inserting from the side. - Serve and Enjoy:
Best enjoyed fresh and warm, these doughnuts are a delight with coffee or tea.
Texture & Flavor Secrets
These doughnuts are crisp on the outside, thanks to a short fry, but fluffy and tender inside. The sugar adds a delicate crunch, while the jelly provides that soft, fruity contrast. Each bite is light yet satisfying, with a balanced sweetness that never overwhelms.
Cooking Tips & Tricks
Make your frying flawless with these quick tips:
- Always test oil temp with a thermometer.
- Fry in small batches to keep oil temp stable.
- Use a chopstick or skewer to gently turn the doughnuts if needed.
- Don’t overfill — a little jelly goes a long way.
What to Avoid
Skip these common missteps and your doughnuts will shine:
- Using hot milk, which can kill the yeast.
- Cutting the dough too thin.
- Overfilling with jelly, which can make them soggy.
- Letting oil get too hot — it will burn the doughnuts outside while staying raw inside.
Nutrition Facts
Servings: 12
Calories per serving: 280
Note: These are approximate values.
Preparation Time
Prep Time: 20 minutes
Cook Time: 20 minutes
Total Time: 2 hours (including rising time)
Make-Ahead and Storage Tips
You can make the dough the night before and let it rise in the fridge. In the morning, bring to room temp, shape, and fry. Store finished doughnuts in an airtight container at room temp for up to 2 days. To refresh, microwave for 10–15 seconds. Avoid refrigerating, as it can dry them out. You can also freeze unfilled, fried doughnuts and fill them fresh after thawing.
How to Serve Jelly Doughnuts
Pile them on a platter with a little bowl of extra jelly for dipping. Dust with extra powdered sugar for a snowy effect. Serve warm with coffee, tea, or even milk for the full nostalgic vibe.
Creative Leftover Transformations
Don’t let even one doughnut go to waste. Try these ideas:
- Slice and toast for a breakfast sandwich (sweet or savory).
- Cube and layer into a trifle with whipped cream and berries.
- Turn into doughnut bread pudding.
- Use as a base for French toast.
Additional Tips
Let your dough rise in a slightly warm oven (turned off) for a faster proof. Want a little zing? Add lemon zest to the dough. For a festive twist, fill with peppermint jelly or spiced apple butter.
Make It a Showstopper
Pipe in multiple jellies for surprise bites. Serve stacked in a doughnut tower with a ribbon for holidays or parties. Add edible flowers or dust with flavored sugar for extra wow.
Variations to Try
Switch things up and try one of these tasty spins:
- Cinnamon Sugar: Roll in cinnamon-sugar instead of plain.
- Lemon Curd Filling: Bright and tart twist on the classic.
- Chocolate-Filled: Pipe in ganache for chocoholics.
- Mini Doughnuts: Use a smaller cutter and reduce fry time.
- Glazed: Skip the sugar coating and dunk in a vanilla or maple glaze.
FAQ’s
Q1: Can I bake these instead of frying?
A1: You can, but they’ll be more like sweet rolls. Frying gives that classic doughnut texture.
Q2: What’s the best jelly to use?
A2: Raspberry, strawberry, and apricot are all favorites — go with what you love.
Q3: Can I make these without a thermometer?
A3: It’s possible, but using one gives consistent, safe results.
Q4: How do I know the dough has risen enough?
A4: It should double in size and leave an indent when poked gently.
Q5: Can I make them gluten-free?
A5: Use a 1-to-1 gluten-free flour blend and add an extra egg for structure.
Q6: How do I store leftover doughnuts?
A6: In an airtight container at room temp for up to 2 days.
Q7: Can I freeze the dough?
A7: Yes, freeze shaped dough before final rise. Thaw and let rise before frying.
Q8: What oil is best for frying?
A8: Vegetable or canola oil work best for neutral flavor and high smoke point.
Q9: How much jelly do I use per doughnut?
A9: About 1 tablespoon per doughnut is perfect.
Q10: Can I double the recipe?
A10: Absolutely, just allow more time for frying in batches.
Conclusion
Jelly Doughnuts are one of those homemade treats that never go out of style. Soft, warm, and bursting with fruity filling, they’re the kind of thing that brings smiles at first bite. So grab your apron, fire up that fryer, and make a batch — trust me, they’re worth every bit of the effort.
Print
Jelly Doughnuts
Description
Fluffy, sugar-coated Jelly Doughnuts with a sweet surprise of fruity filling inside. These classic treats are golden, airy, and absolutely irresistible when homemade.
Ingredients
- 3 1/2 cups all-purpose flour
- 1/4 cup granulated sugar
- 2 1/4 teaspoons active dry yeast
- 1/2 teaspoon salt
- 3/4 cup whole milk
- 1/4 cup unsalted butter, melted
- 2 large eggs
- 1 teaspoon vanilla extract
- Vegetable oil, for frying
- 3/4 cup fruit jelly or jam
Instructions
- Warm the milk until just slightly warm, then stir in sugar and yeast. Let sit 5–10 minutes until foamy.
- In a large bowl, combine flour and salt. Add yeast mixture, eggs, vanilla, and melted butter. Mix until dough forms.
- Knead dough on a floured surface for 5–8 minutes until smooth. Place in greased bowl, cover, and let rise for 1 hour.
- Punch down dough, roll to 1/2-inch thick, and cut circles using a 3-inch cutter. Place on floured tray, cover, and rise 30 minutes.
- Heat oil to 350°F (175°C). Fry doughnuts 1–2 minutes per side until golden brown. Remove and drain on paper towels.
- While warm, roll doughnuts in granulated sugar. Once cooled, fill each with jelly using a piping bag.
- Serve immediately or store in an airtight container for up to 2 days.
Notes
- Use a thermometer to maintain consistent oil temperature while frying.
- Don’t overfill with jelly to avoid soggy centers.
- You can use any jelly or jam flavor you love — raspberry, strawberry, or apricot are popular choices.