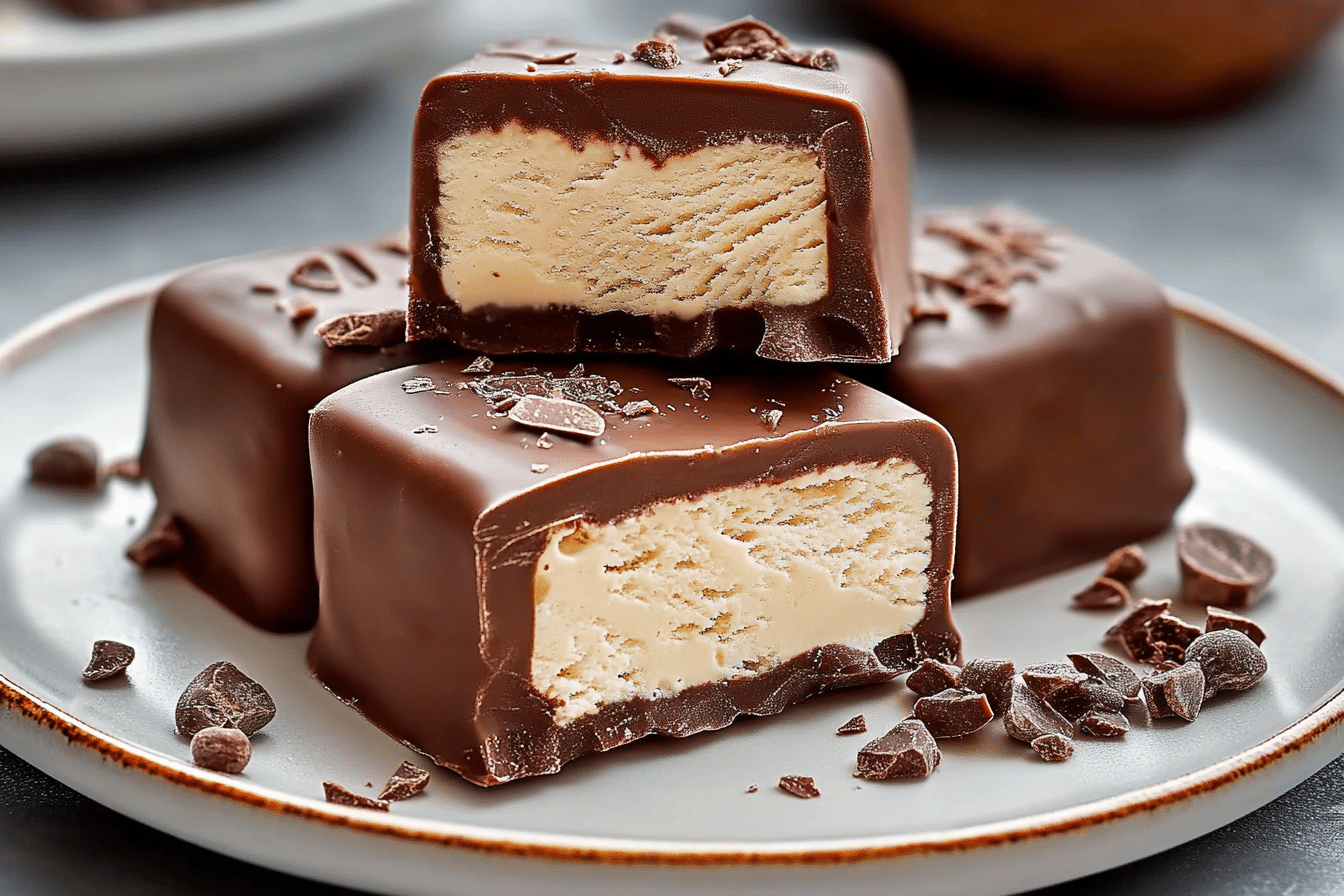
Homemade Chocolate-Covered Ice Cream Bars for Sweet Summer Fun
If you’ve ever dreamt of biting into a perfectly creamy ice cream bar coated in rich, glossy chocolate, then this recipe for Homemade Chocolate-Covered Ice Cream Bars is your new go-to treat. Combining smooth ice cream with that satisfying chocolate crunch, these bars are not only fun to make but also deliver a refreshing taste of summer in every bite. Whether you want a classic snack or a customizable dessert, this recipe strikes the perfect balance of simplicity and deliciousness that will quickly become a favorite for warm days or anytime you crave something sweet and cool.
Why You’ll Love This Recipe
- Simple ingredients: Uses just a handful of accessible items that come together quickly for homemade perfection.
- Customizable flavors: Easily swap ice cream or toppings to suit your personal taste and dietary preferences.
- Crisp chocolate shell: The magic of dipping warm chocolate gives the bars a delightful crunch every time.
- Perfect portion size: Individually made bars are not only fun but ideal for sharing or portion control.
- A fun activity: Great for kids and adults alike who enjoy making their own sweet creations.
Ingredients You’ll Need
This recipe relies on a few simple but essential ingredients, each bringing its own unique texture and flavor to the Homemade Chocolate-Covered Ice Cream Bars. From the creamy base to the hardening chocolate shell, every component plays a critical role in crafting a delightful treat.
- Ice cream of choice: Pick your favorite flavor—vanilla, chocolate, or something fruity—for creamy, cool goodness.
- Chocolate chips or bars: Use high-quality bittersweet or milk chocolate for a smooth, rich coating.
- Coconut oil or shortening: Adds shine to the chocolate and helps it harden quickly on the ice cream.
- Wooden popsicle sticks: Essential for easy handling and that classic ice cream bar feel.
- Optional toppings: Crushed nuts, sprinkles, or sea salt can add texture and extra flavor.
Variations for Homemade Chocolate-Covered Ice Cream Bars
One of the best things about Homemade Chocolate-Covered Ice Cream Bars is how easy it is to customize them based on your cravings, dietary needs, or available ingredients. Experimenting with different flavors and toppings makes this recipe endlessly fun and unique.
- Dairy-free version: Use coconut or almond milk-based ice cream to keep the bars vegan and allergy-friendly.
- Nutty delight: Add finely chopped almonds, peanuts, or pistachios to the chocolate shell for extra crunch.
- Fruit-infused surprise: Swirl in berry sauces or sprinkle dried fruit bits inside before freezing for fruity bursts of flavor.
- Decadent drizzle: After dipping, drizzle white chocolate or caramel on top for a gourmet look.
- Spiced chocolate: Mix a pinch of cinnamon or chili powder into the melted chocolate for a surprising kick.

How to Make Homemade Chocolate-Covered Ice Cream Bars
Step 1: Prepare the Ice Cream Base
Start by softening your chosen ice cream slightly at room temperature, making it easy to mold. Spoon the ice cream into bar-shaped silicone molds or a tray lined with parchment paper, then insert wooden sticks. Freeze until completely firm, typically several hours or overnight.
Step 2: Melt the Chocolate Coating
In a microwave-safe bowl or using a double boiler, melt your chocolate chips or chopped bars gently. Stir in coconut oil or shortening to achieve a smooth, pourable consistency that will harden quickly on contact with cold ice cream.
Step 3: Dip the Frozen Bars
Remove the ice cream bars from molds carefully. Holding by the stick, dip each bar into the melted chocolate, ensuring an even coat. Let any excess chocolate drip off before placing the bars on a parchment-lined tray to set instantly in the freezer.
Step 4: Add Optional Toppings
Sprinkle nuts, sprinkles, or sea salt onto the chocolate while it is still wet to allow it to stick. Pop the bars back into the freezer to ensure the chocolate hardens fully.
Step 5: Serve and Enjoy
Once the chocolate shell is firm, your Homemade Chocolate-Covered Ice Cream Bars are ready to eat! Keep them stored in the freezer until ready to serve to maintain that perfect texture.
Pro Tips for Making Homemade Chocolate-Covered Ice Cream Bars
- Use cold ice cream: Freeze ice cream bars thoroughly before dipping to prevent melting during chocolate coating.
- Add fats to chocolate: A teaspoon of coconut oil helps the chocolate harden with a nice sheen and snap.
- Work quickly: Dip bars in chocolate rapidly to keep ice cream from softening too much.
- Choose quality chocolate: Better chocolate means better flavor and texture for your coating.
- Double freeze: Refreeze dipped bars immediately to get perfectly crisp shells.
How to Serve Homemade Chocolate-Covered Ice Cream Bars
Garnishes
Enhance your ice cream bars with a sprinkle of crushed nuts, toasted coconut flakes, or a pinch of flaky sea salt to elevate both the look and the flavor profile.
Side Dishes
Pair these bars with fresh fruit salad, a drizzle of warm berry compote, or a simple glass of sparkling lemonade for a refreshing summer spread.
Creative Ways to Present
Serve the bars on colorful platters, add edible flowers for a pop of color, or present them individually wrapped in parchment for parties or gift-giving occasions.
Make Ahead and Storage
Storing Leftovers
Keep any uneaten Homemade Chocolate-Covered Ice Cream Bars tightly wrapped in plastic wrap or stored in an airtight container in the freezer to prevent ice crystals from forming.
Freezing
Freeze bars for up to two weeks for optimal taste and texture. Make sure they are fully frozen before wrapping to avoid melting and refreezing issues.
Reheating
Since these are frozen treats, reheating isn’t recommended. Instead, allow the bars to soften slightly at room temperature for 5 minutes if you prefer a creamier bite.
FAQs
Can I use store-bought ice cream for this recipe?
Absolutely! Any high-quality store-bought ice cream will work wonderfully for Homemade Chocolate-Covered Ice Cream Bars, giving you convenience without sacrificing taste.
How do I prevent the chocolate from cracking?
Ensure that you add a bit of coconut oil or shortening to your melted chocolate for a smoother, less brittle coating that sets just right.
Can I make these bars ahead of time for a party?
Yes, you can prepare and freeze the bars ahead of time, making them a stress-free dessert option for gatherings and celebrations.
What chocolate is best for dipping?
Semi-sweet or bittersweet chocolate works best because it balances sweetness with rich cocoa flavor and hardens nicely when cooled.
Is it possible to make these dairy-free?
Definitely! Use dairy-free ice cream such as coconut or almond milk-based varieties along with vegan chocolate for a delicious dairy-free Homemade Chocolate-Covered Ice Cream Bars treat.
Final Thoughts
If you’re looking to bring some cool, chocolatey happiness into your summer or any day that calls for a special treat, trying these Homemade Chocolate-Covered Ice Cream Bars is a must. They’re surprisingly simple to make, endlessly customizable, and guaranteed to satisfy your sweet tooth with every bite. So grab your favorite ice cream and chocolate, gather the family, and dive into this fun and delicious dessert adventure!
Related Posts
- Double Chocolate Cheesecake Cake for Ultimate Chocolate Lovers
- Cherry Cake with Creamy Cherry Cream Cheese Frosting Delight
- Homemade Moose Tracks Ice Cream with Rich Fudge & Peanuts
Homemade Chocolate-Covered Ice Cream Bars
- Prep Time: 15 minutes (plus freezing time)
- Cook Time: 10 minutes
- Total Time: 4-6 hours (including freezing time)
- Yield: 6-8 bars
- Category: Desserts
- Method: Freezing and dipping
- Cuisine: American
- Diet: Vegetarian (optional dairy-free/vegan with substitutions)
Description
Enjoy a refreshing and delicious summer treat with these Homemade Chocolate-Covered Ice Cream Bars. Featuring creamy ice cream coated in a crisp, glossy chocolate shell, they are easy to make, customizable to your taste, and perfect for portion control. Fun for all ages, these bars combine smooth, cool ice cream with a satisfying chocolate crunch in every bite.
Ingredients
Ice Cream Base
- Ice cream of choice (vanilla, chocolate, fruity, or dairy-free options)
- Wooden popsicle sticks
Chocolate Coating
- High-quality chocolate chips or bars (bittersweet, semi-sweet, or milk chocolate)
- Coconut oil or shortening (about 1 teaspoon per 1 cup of chocolate)
Optional Toppings
- Crushed nuts (almonds, peanuts, pistachios)
- Sprinkles
- Sea salt
- Dried fruit bits
- Berry sauce or fruit swirls
- White chocolate or caramel for drizzling
- Spices such as cinnamon or chili powder
Instructions
- Prepare the Ice Cream Base: Soften your chosen ice cream slightly at room temperature to make it easy to mold. Spoon the ice cream into bar-shaped silicone molds or a tray lined with parchment paper, then insert wooden popsicle sticks. Freeze the bars until completely firm, typically several hours or overnight.
- Melt the Chocolate Coating: Gently melt your chocolate chips or chopped chocolate bars in a microwave-safe bowl or using a double boiler. Stir in coconut oil or shortening until you achieve a smooth, pourable consistency that will harden quickly on contact with cold ice cream.
- Dip the Frozen Bars: Carefully remove the ice cream bars from the molds. Holding each bar by the stick, dip it into the melted chocolate, ensuring an even coat. Allow any excess chocolate to drip off before placing the bars on a parchment-lined tray. Immediately transfer them to the freezer to set.
- Add Optional Toppings: While the chocolate coating is still wet, sprinkle nuts, sprinkles, or sea salt onto the bars to help them stick. Return the bars to the freezer to allow the chocolate and toppings to harden completely.
- Serve and Enjoy: Once the chocolate shell is firm, the bars are ready to be enjoyed! Keep them stored in the freezer until serving to maintain the perfect texture.
Notes
- Use thoroughly frozen ice cream bars before dipping to prevent melting during coating.
- Add fats like coconut oil to melted chocolate for a shiny, crisp shell.
- Work quickly when dipping to avoid softening the ice cream.
- Choose high-quality chocolate for better flavor and texture.
- Refreeze dipped bars immediately for perfectly crisp shells.
Nutrition
- Serving Size: 1 bar
- Calories: Approx. 200-300 (varies by ice cream and toppings)
- Sugar: 20-25g
- Sodium: 50-70mg
- Fat: 12-18g
- Saturated Fat: 8-12g
- Unsaturated Fat: 3-5g
- Trans Fat: 0g
- Carbohydrates: 25-30g
- Fiber: 1-3g
- Protein: 3-5g
- Cholesterol: 30-45mg