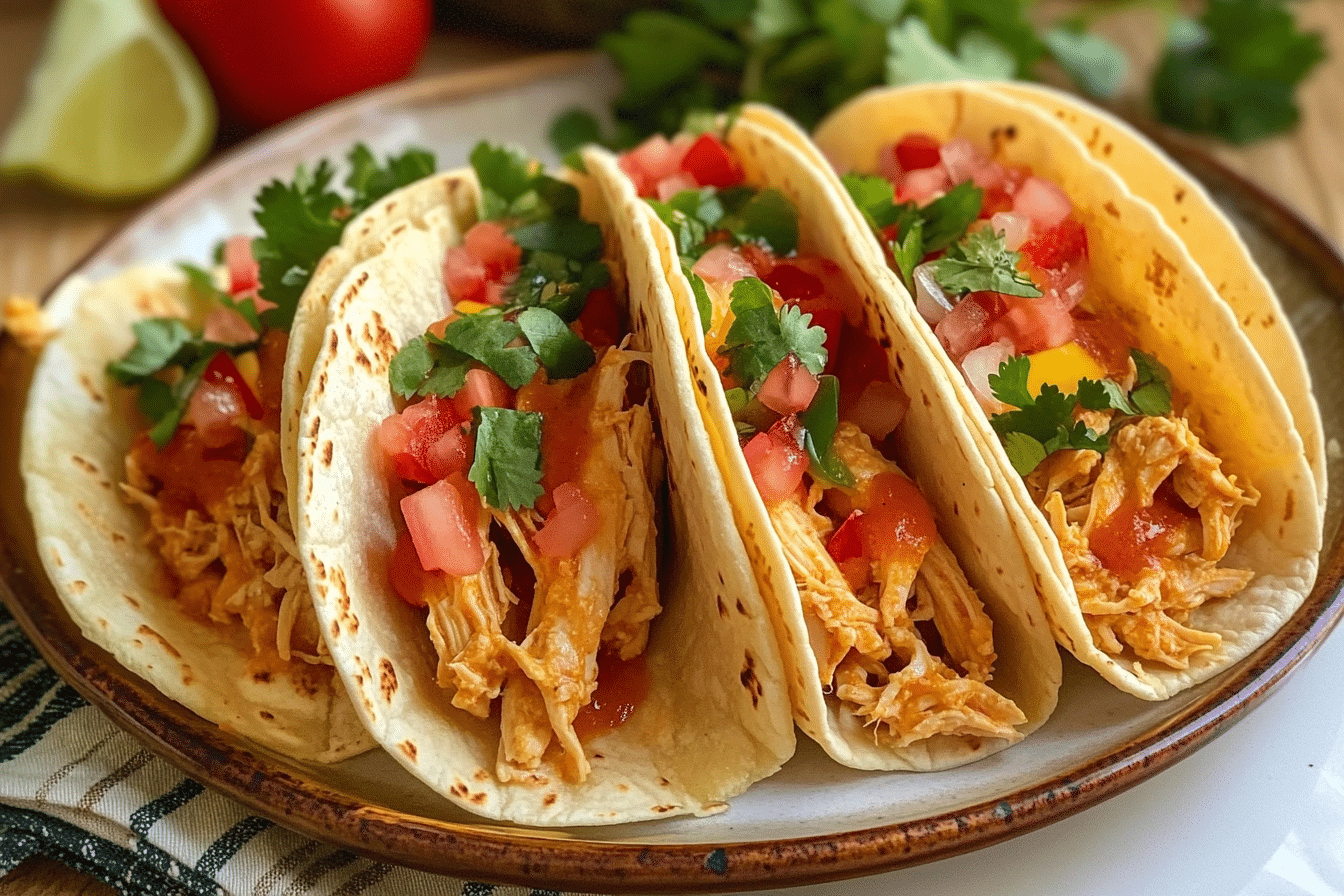
Irresistibly Cheesy Pulled Chicken Tacos Ready in Minutes
Get ready to dive into a plate of pure comfort with these Cheesy Pulled Chicken Tacos, a dish that brings together juicy, tender chicken and irresistibly melty cheese wrapped in soft tortillas. This recipe is a fantastic blend of flavors and textures that’s quick to prepare, making it the perfect go-to for busy weeknights when you want something hearty yet simple. With every bite, you’ll savor that wonderful cheesy pull combined with seasoned, shredded chicken that’s bursting with flavor.
Why You’ll Love This Recipe
- Super Quick to Make: Perfect for busy evenings, this recipe comes together in minutes without sacrificing flavor.
- Rich, Comforting Flavor: The combination of melted cheese and tender pulled chicken delivers a warm, satisfying taste experience.
- Versatile Dish: Easily customizable with your favorite toppings or sides to suit any craving or dietary preference.
- Family-Friendly: Kids and adults alike can’t resist the cheesy goodness and juicy chicken in every taco.
- Meal Prep Friendly: Makes great leftovers that reheat beautifully without losing their charm.
Ingredients You’ll Need
Keeping the ingredient list simple yet essential is key here. Each ingredient plays a role in achieving mouthwatering flavor, the perfect texture, or vibrant color that makes these Cheesy Pulled Chicken Tacos stand out.
- Chicken Breast or Thighs: Use boneless, skinless for easy shredding and juicy results.
- Shredded Cheese: A blend of cheddar and Monterey Jack creates that irresistible melt and flavor.
- Taco Seasoning: Homemade or store-bought spice mix adds smoky, savory depth to the chicken.
- Corn or Flour Tortillas: Soft and warm tortillas cradle all that cheesy, shredded goodness perfectly.
- Onion and Garlic: Fresh aromatics that boost the overall savory profile of the dish.
- Butter or Oil: For sautéing and adding richness to the chicken as it cooks.
- Fresh Cilantro and Lime: Optional but great for adding a bright, fresh finish.
- Sour Cream or Avocado: Creaminess options for topping that balance the spices.
Variations for Cheesy Pulled Chicken Tacos
Feel free to tailor this recipe to fit your mood, pantry, or dietary needs. These easy swaps and additions shine just as brightly as the classic version.
- BBQ Pulled Chicken: Swap taco seasoning for BBQ sauce for a smoky, tangy twist that’s just as cheesy.
- Spicy Kick: Add diced jalapeños or a splash of hot sauce to bring heat to your cheesy tacos.
- Vegetarian Version: Use shredded jackfruit or mushrooms as a plant-based alternative that soaks up cheese wonderfully.
- Low-Carb Option: Serve in lettuce wraps instead of tortillas to keep carbs down without losing the crunch.
- Extra Veggies: Incorporate sautéed bell peppers and corn for added texture and color.

How to Make Cheesy Pulled Chicken Tacos
Step 1: Cook and Shred the Chicken
Start by poaching or pan-cooking your chicken breasts or thighs until fully cooked and tender. Once cooled slightly, shred the meat using two forks to get that perfect pulled texture.
Step 2: Prepare the Seasoned Cheese Mixture
In a skillet, sauté diced onions and garlic in butter or oil until soft and fragrant. Add taco seasoning and shredded chicken, stirring well to coat every bite with flavor.
Step 3: Melt the Cheese
Lower the heat and layer in the shredded cheese, mixing gently until it melts into a creamy, gooey coating that clings to every piece of chicken.
Step 4: Warm the Tortillas
Heat your corn or flour tortillas in a dry skillet or microwave to make them pliable and warm, creating the perfect vessel for your cheesy filling.
Step 5: Assemble Your Tacos
Fill each tortilla generously with the cheesy pulled chicken mixture. Top with fresh cilantro, a squeeze of lime, and your favorite creamy garnishes like sour cream or avocado slices.
Pro Tips for Making Cheesy Pulled Chicken Tacos
- Use Warm Chicken: Shred the chicken while it’s still warm for easier pulling and better flavor absorption.
- Cheese Choice Matters: Opt for cheese that melts smoothly like Monterey Jack or mild cheddar for perfect gooey texture.
- Don’t Overload Tortillas: Avoid overfilling to prevent breaking and ensure every bite is neat and tasty.
- Layer Flavors: Toast the tortillas lightly first to add depth before assembling.
- Fresh Herbs Add Zing: Cilantro and a squeeze of lime cut through the richness and brighten the dish.
How to Serve Cheesy Pulled Chicken Tacos
Garnishes
Classic garnishes like fresh cilantro, diced onions, avocado slices, and a dollop of cool sour cream complement the cheesy pulled chicken perfectly, adding freshness and texture contrast.
Side Dishes
Pair your tacos with simple sides such as Mexican rice, refried beans, or a fresh corn salad to round out the meal beautifully.
Creative Ways to Present
Try serving the cheesy pulled chicken taco filling as nachos topping or inside mini taco cups for a fun appetizer twist that’s just as cheesy and satisfying.
Make Ahead and Storage
Storing Leftovers
Keep any leftover cheesy pulled chicken filling in an airtight container in the fridge for up to 3 days, so you can enjoy quick meals throughout the week.
Freezing
This chicken mixture freezes well—portion into freezer-safe containers and freeze for up to 2 months, then thaw in the fridge before reheating.
Reheating
Reheat gently in a skillet over low heat or in the microwave, adding a splash of water or broth to keep the chicken moist and the cheese melty.
FAQs
Can I use rotisserie chicken for this recipe?
Absolutely! Using rotisserie chicken is a fantastic shortcut that can save time and still deliver delicious cheesy pulled chicken tacos.
What cheese works best for melting?
Monterey Jack, cheddar, or a blend of both are ideal because they melt smoothly and provide great flavor without becoming greasy.
Are these tacos spicy?
The basic recipe is mild, but you can easily add jalapeños, hot sauce, or chili powder for a spicier kick.
Can I make this recipe gluten-free?
Yes! Simply use gluten-free tortillas or lettuce wraps to enjoy these cheesy pulled chicken tacos without gluten.
How long does it take to prepare the tacos?
This recipe can be ready in about 20-30 minutes, from cooking the chicken to assembling the tacos, making it perfect for busy nights.
Final Thoughts
These Cheesy Pulled Chicken Tacos are a true weeknight hero—quick, comforting, and full of flavor that will have everyone asking for seconds. Give this recipe a try, and you’ll soon see why it’s become such a beloved dish for so many taco lovers. Once you taste that melty, seasoned chicken in every bite, you’ll want this recipe in your regular meal rotation!
Related Posts
- Garlic Herb Chicken Thighs with Bold, Savory Punch
- Scallion Chicken Recipe That Bursts with Flavor
- Authentic American Goulash Recipe for Hearty Weeknight Dinners

Cheesy Pulled Chicken Tacos
- Prep Time: 10 minutes
- Cook Time: 15 minutes
- Total Time: 25 minutes
- Yield: 8 tacos
- Category: Appetizers
- Method: Pan-cooking and sautéing
- Cuisine: Mexican
- Diet: Gluten-Free option by using corn tortillas or lettuce wraps
Description
Cheesy Pulled Chicken Tacos combine tender, juicy shredded chicken with a melty blend of cheddar and Monterey Jack cheeses, wrapped in warm tortillas. This quick and comforting recipe is perfect for busy weeknights, offering a versatile and family-friendly meal that’s easy to customize and prep ahead.
Ingredients
Chicken
- 1 lb boneless, skinless chicken breasts or thighs
Cheese
- 1 to 1 ½ cups shredded cheddar and Monterey Jack cheese blend
Seasoning & Aromatics
- 1 tablespoon taco seasoning (homemade or store-bought)
- ½ cup diced onion
- 2 cloves garlic, minced
Cooking Fat
- 1 tablespoon butter or oil for sautéing
Wraps
- 8 soft corn or flour tortillas
Optional Garnishes
- Fresh cilantro, chopped
- 1 lime, cut into wedges
- Sour cream or avocado slices for topping
Instructions
- Cook and Shred the Chicken: Poach or pan-cook the chicken breasts or thighs until fully cooked and tender. Allow to cool slightly, then shred the meat using two forks to achieve a perfect pulled texture.
- Prepare the Seasoned Cheese Mixture: In a skillet, sauté diced onions and minced garlic in butter or oil over medium heat until soft and fragrant. Add taco seasoning and shredded chicken, stirring well to coat each piece in flavor.
- Melt the Cheese: Reduce the heat to low, then add the shredded cheese blend. Gently mix until the cheese melts into a creamy, gooey coating that clings to every piece of chicken.
- Warm the Tortillas: Heat corn or flour tortillas in a dry skillet or microwave until warm and pliable, making them perfect to hold the cheesy chicken filling.
- Assemble Your Tacos: Generously fill each tortilla with the cheesy pulled chicken mixture. Top with fresh cilantro, a squeeze of lime, and your choice of creamy garnishes such as sour cream or avocado slices for added flavor and freshness.
Notes
- Use warm chicken when shredding for easier pulling and better absorption of seasoning.
- Choose cheeses like Monterey Jack or mild cheddar for smooth melting and the perfect gooey texture.
- Avoid overfilling the tortillas to prevent breakage and maintain neat, easy-to-eat tacos.
- Lightly toast tortillas before assembling to add flavor depth and improve texture.
- Fresh herbs like cilantro and a squeeze of lime brighten the dish and cut through richness.
Nutrition
- Serving Size: 2 tacos
- Calories: 350 kcal
- Sugar: 2 g
- Sodium: 450 mg
- Fat: 18 g
- Saturated Fat: 9 g
- Unsaturated Fat: 7 g
- Trans Fat: 0 g
- Carbohydrates: 25 g
- Fiber: 3 g
- Protein: 28 g
- Cholesterol: 85 mg