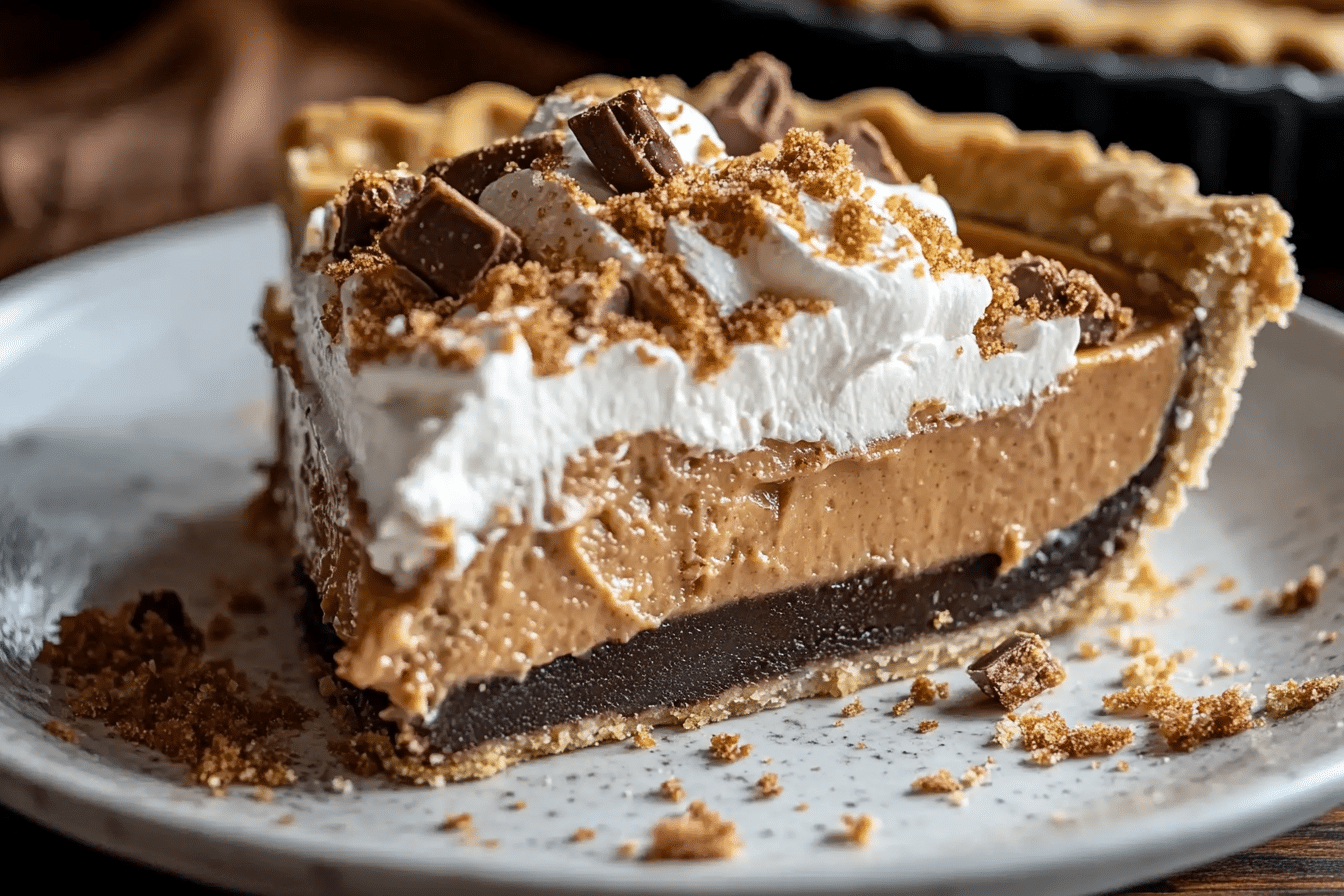
Butterfinger Pie
There’s something wildly nostalgic and utterly irresistible about Butterfinger Pie. It’s the kind of dessert that makes you feel like a kid again—just one bite and suddenly you’re grinning like you just discovered candy for the first time. With its creamy filling, chocolatey base, and crunchy bits of Butterfinger goodness, this pie is an absolute showstopper. Trust me, you’re going to fall head over heels for it. Whether you’re serving it up at a potluck, whipping it out for a birthday, or sneaking a slice at midnight (we’ve all been there), this one’s a game-changer.
Why You’ll Love Butterfinger Pie
This recipe isn’t just about the ingredients it’s about creating moments. Whether you’re cooking for a casual family dinner, hosting a get-together with friends, or simply indulging in some comforting flavors for yourself, this dish is versatile enough to fit the occasion. Here’s why it’s a favorite:
Versatile: Perfect for parties, celebrations, or simply when your sweet tooth strikes.
Budget-Friendly: Made with simple, accessible ingredients—no fancy stuff required.
Quick and Easy: Minimal prep time and zero baking? Count us in.
Customizable: Want it extra chocolatey? Go for it. Prefer a peanut butter twist? You can do that too.
Crowd-Pleasing: A guaranteed hit with both kids and adults. It’s always a win when a single dish can satisfy everyone at the table. This recipe strikes the perfect balance of flavor and comfort, making it a universal favorite.
Ingredients in Butterfinger Pie
Here’s the sweet magic—this pie is made with just a few familiar ingredients, but each one plays a delicious role in creating the creamy-crunchy dream you’re about to devour:
Chocolate Cookie Crust: The rich, slightly bitter base that perfectly balances the sweetness of the filling. It’s like the stage where all the flavors come to perform.
Cream Cheese: Soft, creamy, and tangy—this gives the pie its signature luscious texture. Room temperature is key for smooth mixing!
Peanut Butter: Adds a deep, nutty flavor that pairs beautifully with the Butterfinger pieces. Plus, it makes everything taste a little more indulgent.
Powdered Sugar: Sweetens things up just right without being overpowering.
Whipped Topping: Lightens the filling and gives it that dreamy, airy texture. Fold it in gently to keep things fluffy.
Butterfinger Candy Bars: The crunchy, peanut-buttery stars of the show! Crushed and folded right in, they add the perfect pop of flavor and texture in every bite.
(Note: the full ingredients list, including measurements, is provided in the recipe card directly below.)

Instructions
Let’s dive into the steps to create this flavorful masterpiece:
Preheat Your Equipment: No need to preheat anything here—this is a no-bake dessert, which means it’s super low-effort and totally stress-free.
Combine Ingredients: In a large bowl, beat the cream cheese, peanut butter, and powdered sugar until smooth and creamy. You want a nice, velvety base before adding the other ingredients.
Prepare Your Cooking Vessel: Your crust is likely ready to go, especially if you’re using a pre-made one. If not, press your chocolate cookie mixture firmly into a pie dish and chill it for about 15 minutes to set.
Assemble the Dish: Fold the whipped topping and crushed Butterfinger candy bars into the cream cheese mixture. Gently fold, not stir, to keep that airy, fluffy texture intact.
Cook to Perfection: No cooking necessary! Just pour the mixture into the crust, spreading it evenly with a spatula to create a smooth surface.
Finishing Touches: Sprinkle more crushed Butterfinger bars on top for extra crunch and a pretty finish.
Serve and Enjoy: Chill the pie in the fridge for at least 4 hours or overnight. Slice, serve, and watch it disappear—seriously, it won’t last long.
Nutrition Facts:
Servings: 8
Calories per serving: 430
(put them as notes)
Preparation Time
Prep Time: 15 minutes
Cook Time: 0 minutes
Total Time: 4 hours 15 minutes (including chilling time)
How to Serve Butterfinger Pie
This dish pairs wonderfully with various sides and accompaniments. Here are a few serving suggestions to enhance your dining experience:
Serve chilled with a dollop of whipped cream on top, a drizzle of chocolate sauce, or even a scoop of vanilla ice cream on the side. For a fancy touch, garnish with chocolate shavings or a peanut butter swirl.
Additional Tips
Here are some extra tips to help you get the most out of this recipe:
- Let the cream cheese come to room temperature before mixing—it’ll save you from lumps.
- Crush the Butterfinger bars by placing them in a zip-top bag and using a rolling pin.
- Want to switch it up? Try using a graham cracker crust or adding a layer of chocolate ganache on top.
- Store leftovers covered in the fridge for up to 5 days (if it lasts that long).
- For clean slices, dip your knife in hot water and wipe it between cuts.
FAQ’s
1 What can I use instead of Butterfinger bars?
You can swap them out for other crunchy candy bars like Heath, Reese’s, or even Snickers.
2 Can I make this pie ahead of time?
Absolutely! It’s actually best when made a day in advance to let all the flavors meld together.
3 Is this pie freezer-friendly?
Yes! Wrap it tightly and freeze for up to a month. Just thaw in the fridge before serving.
4 Can I use homemade whipped cream?
Of course—just make sure it’s whipped to stiff peaks before folding it into the filling.
5 How do I prevent the crust from getting soggy?
Using a pre-made crust or chilling a homemade one before filling helps keep it firm.
6 Can I make it without peanut butter?
You can! Just add a bit more cream cheese and a splash of vanilla extract to make up for the flavor.
7 Is this recipe gluten-free?
It can be if you use a gluten-free cookie crust and check that your candy bars are gluten-free too.
8 What’s the best way to crush the Butterfinger bars?
Pop them in the fridge first, then place them in a bag and use a rolling pin or the bottom of a glass to crush.
9 Can I make it in mini pie tins or jars?
Yes! This recipe is super fun as individual servings for parties or gifting.
10 How long does it need to chill?
At least 4 hours, but overnight is best for the perfect set and flavor.
Conclusion
Butterfinger Pie is the kind of dessert that makes people swoon—and then ask for seconds. It’s creamy, crunchy, chocolatey, and downright dreamy. Whether you’re making it for a celebration or just because you deserve a treat (you do!), this pie is always a sweet success. Grab your spoon, and dig in—you’re going to love every bite.
Print
Butterfinger Pie
- Prep Time: 15 minutes
- Cook Time: 0 minutes
- Total Time: 4 hours 15 minutes (including chilling time)
- Yield: 8 servings
- Category: Dessert
- Method: No-Bake
- Cuisine: American
- Diet: Vegetarian
Description
Butterfinger Pie is a rich and creamy no-bake dessert made with crushed Butterfinger candy bars, cream cheese, and whipped topping in a graham cracker crust.
Ingredients
- 1 graham cracker pie crust (9-inch)
- 8 oz cream cheese, softened
- 1/2 cup powdered sugar
- 8 oz whipped topping (such as Cool Whip)
- 6 Butterfinger candy bars (1.9 oz each), crushed
- 1 tsp vanilla extract
- Optional: extra crushed Butterfinger for topping
Instructions
- In a large bowl, beat the cream cheese and powdered sugar until smooth.
- Stir in the vanilla extract.
- Fold in the whipped topping until well combined.
- Add crushed Butterfinger bars and mix gently to distribute evenly.
- Spoon the mixture into the graham cracker crust and smooth the top.
- Sprinkle extra crushed Butterfinger on top if desired.
- Refrigerate for at least 4 hours or until set.
- Slice and serve chilled.
Notes
- Chill the pie overnight for best results.
- You can freeze the pie for a firmer texture.
- Use mini Butterfinger bites for easier crushing.
Nutrition
- Serving Size: 1 slice
- Calories: 420
- Sugar: 32g
- Sodium: 280mg
- Fat: 25g
- Saturated Fat: 12g
- Unsaturated Fat: 10g
- Trans Fat: 0g
- Carbohydrates: 42g
- Fiber: 1g
- Protein: 4g
- Cholesterol: 30mg